Showing posts with label dots. Show all posts

Wednesday, November 20, 2013

DIY Advent Calendar: Igloo Village!


Pin It

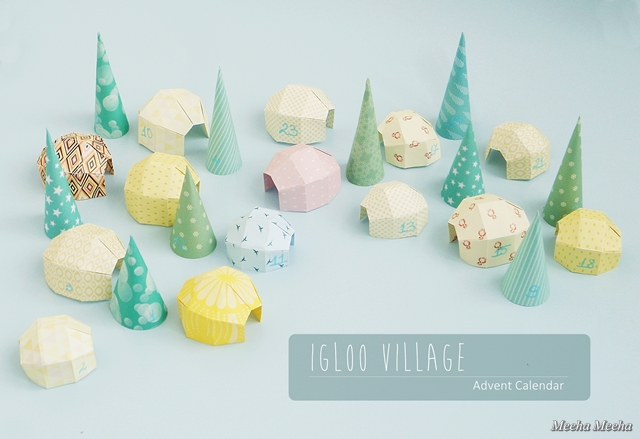
This year I thought I'd kill two birds with one stone with this DIY project: a Christmas village AND an Advent calendar. My first ideas were quite traditional, like making gingerbread houses. But after giving it a little thought, I decided to make something new and exciting: the Igloo Village! It's perfect for Christmas, since the igloos are always snowed in. And the round shapes of the ice homes are simply adorable :)


The Igloo Village is always in the mood for winter fun. It is made of origami paper, so it's light, small and easy to move around the home. Also, if it survives the holidays and the curiosity of my cats, it could be stored away in a small box, until next year. In theory, igloos are white - but mine are colorful, because when the sun shines across the endless sea of ice, the snow sparkles in soft tones of yellow, blue and even pink!


For the countdown to Christmas, I've made 24 little units: 14 origami igloos (in 2 sizes) and 10 paper trees (also in 2 sizes). Each item has its own number written on the side. The village display is random, so you need to find your next number, which adds a little to the excitement. 


The Igloo village Advent calendar also doubles as a treasure hunt. Hide little treats, small messages, tree decorations or tiny toys under each house and tree. This way, the joy of Christmas gets sweeter every day! For me, it was toys all the way, as you can see in the image above. You can also use the paper igloos and trees to decorate the Christmas tree, if you hang them by a thread :)


Last but not least, I must tell you that the Igloo village looks great at night time, too! Since it is already pitch black each evening when I come back from work, it is a pleasure to take a peek at my Advent calendar, sitting quietly under the soft glow of a small lamp! 


If you haven't got an Advent Calendar for this season yet, it's easy to replicate this one. I'm sharing the tutorial below, split in 2 parts: the igloos and the cone trees. It took me 3 hours to make the entire village, but prepare to spend a little more time if you're a novice in paper crafts in general and origami in particular.


Origami igloo tutorial
For this project you will need:
- origami igloo template: I used this great one from the talented Francesco Guarnieri.
- patterned square origami paper. I worked with two sizes: 8.5 x 8.5 cm square sheets and 10 x 10 cm square sheets.
- pencil and ruler for marking where you need to fold the paper.


How to make the origami igloo:
1. Lay the paper square on the blank side. Mark where you need to fold the paper in 5.
2. Start folding the paper in 5 equal strips horizontally, then in 4 equal strips vertically.
3. The folded paper should look like a grid.
4. Fold the extreme strips inside.
5. Fold again and make a little crease just like in the template.
6. Repeat another two times. The paper should look like this. Mark all the valley and mountain folds, for easy final assembling.
7. This is the tricky part: get the valley folds in one hand and flip it on the inside.
8. Carefully press the paper folds in order to make the final shape.
9. Repeat steps 7 and 8 on the other side of the igloo and you're done!


Paper trees tutorial
For this project you will need:
- cone tree template: I used these ones but in a smaller scale.
- patterned origami paper. The small trees fit into 8.5 x 8.5 cm square sheets and the tall ones fit into 10 x 10 cm square sheets.
- pencil and ruler for drawing the template outline and for marking where you need to fold the paper.
- scissors and glue stick.


How to make the paper tree:
1. Print the template on cardboard and cut it out. I didn't make the round base, just the cone. Lay the template on the blank side of the origami paper. Draw the outline. Be careful not to move the template during the process.
2. Cut out the origami paper, following the outline.
3. Fold the paper along the marked line.
4. Fold again on the other side. Apply glue on the patterned folded strip.
5. Turn the paper on the good side and put the edges together to make the cone shape. The long edge must overlap the glued strip. Gently press with your fingers until the glue sets in.
6. Enjoy the paper trees and the entire Igloo village!


Tuesday, April 16, 2013

The Textile Vase


Pin It

I think that no matter how much we admire their endless beauty, flowers are still underestimated. There is simply no measure for the wonder of flowers. Each time I take pics of flowers, I get lost... I could shoot them all day long (and then some more). So I always search new and improved ways to make flower arrangements - this time it's an impromptu fabric vase!


It all started with this wonderful  little pouch - a gift from my Norwegian friend Lisa from Lisa Sol. She is one extraordinary lady, who's love for beauty and keen eye for detail never cease to amaze me. She sent me the little pouch as a gift, after we just bonded on the Internet. Thank you, Lisa, one more time, I wish every one could see all the perfection of every millimeter of this little textile jewel!


My adorable pouch has got 4 large pockets, so I can store inside jewelry, colorful beads, small trinkets or anything my heart desires - in a very organized way! But I wanted to show off the pouch a little more, so I transformed it into a textile vase, the star of my tea party. I was very careful not to damage the pouch - see how I've done it at the end of this post!


The spring weather was rainy and sad, so when the sun finally came through I had this urge to celebrate. With cake. Chocolate cake, to be precise - lots of chocolate, please! There was a small Russian doll invited to the party, a hyacinth planted in my pink creamer and a china set from .... China, that my parents got as a wedding gift in 1975.


The centerpiece for this small tea party is made of spring flowers: freesias and tulips in assorted colors. They smell so fresh! I also made a little trick on the table - I put the textile vase up high on an upside bowl, just like a pedestal, in order to add some height for the little pouch and to make it stand out among the tea cups.


So here is the tutorial for making a textile vase. For this little project you'll need a bunch of assorted flowers, a fabric pouch, florist foam, a clear plastic roll and scissors.
1. Cut a cube from the florist foam and let it soak in water. Cut a large piece of plastic roll and wrap the wet florist foam, three times, so that the water never touches the fabric.
2. Cut all the flowers short and insert them into the foam cube. Start with the biggest blooms (in my case, the tulips) and spread them evenly. Fill in the gaps using the smaller flowers (in my case, I filled it up with freesias, until I had a round arrangement).
3. Insert the bouquet into the pouch - very carefully! Then close the pouch and never open it again until the next day, when you'll need to add a little water into the foam. Enjoy your unusual spring centerpiece!


Yay, the textile vase has just been featured at Smart School House, Creating My Way To Success, Handmade Cuddles and JAQS Studio. Thanks a million for the feature!

Friday, January 18, 2013

The Reading Spot


Pin It

Look, there is a spotted pillow in the reading spot :)) Sorry, I just couldn't resist the pun. It looks like there are more doors than corners in my small apartment, because of the architecture itself and because I tore down some walls when I redecorated it. So the quiet corner is near the door, but who cares... I've assorted the Mad Hatter poster to a tiny lithography in the same colors. One big and one very small, I love the contrast between those two pieces of art on the white wall. Their vivid colors are completed by the earth tones of the wooden stool, the Ikea pillow and the pine wood door. Oh and I'm currently reading a SF novel by the Strugatsky brothers.


Tuesday, November 27, 2012

Random Happy Home


Pin It

Pheew! Now that my Advent Calendar is up, there is only one thing to do: prepare for Christmas! I look around my little apartment and I see how the colors of the Fall make way to the Christmas fluffiness (it's all about the fluffy side of life with me!). Some things change, and some stay the same, like my princess lamp  shade next to the purple plum wall in the bedroom.


The chrysanthemum in a tea cup: soft lavender, turquoise and peach for a little November vignette. 


The neon pumpkin looks even shinier than before and is currently serving as an organic bookend. 


Full fluffiness ahead: the cats' favorite nap spot: a giant jute beanbag and a sheepskin pillow in the shadow.


More mums on the coffee table, the last days of glory for my Halloween gallery wall and a lovely mess drowning in a sea of colored dots. 

Wednesday, November 7, 2012

Toy Horse


Pin It

Autumn means to me a green light to play with toy animals. Perhaps you've already seen the dark bear, the hedgehog and the okapi who gathered under the autumn flower ball. Well, this time I'm having a little girl crush on this brown horse, running wild on my cupboards. The wind makes waves in its pretty hair and the Fall flowers have climbed up on a mini-mug tower, in order to get a better look at its beauty. Run free, little horse toy!

Sunday, July 1, 2012

Don't Play With Your Food


Pin It

Easier said than done, when these adorable cherry tomatoes keep playing on my kitchen counter. It's not my fault that they decided to make Mickey Mouse funny faces! And those pink peonies keep shedding their petals into my polka-dot bowls! What was I to do, just sit around and pretend I didn't see them?! So I made a mature gesture and took out my camera, in order to snap some evidence pics for future reference. If I see any of you little cherry tomatoes jumping up on the counter again, these pictures will hit the tabloids! Guess which decent people will have the courage to eat you then...


Tuesday, June 26, 2012

Lime And Turquoise


Pin It

(... and a little bit of candy pink!)
I really lost all my patience and I wanna go to the seaside NOW! Why do I have to suffer for two more hot weeks, why? Why do I keep seeing relaxing pics from the Mediterranean everywhere I look, especially on the blogs of my new virtual friends from Spain, Greece and Italy? Haven't they got a heart?! Don't they know that an innocent Romanian girl tries to relax browsing through their marine pics, but instead she just chokes in agony? I will get to the sea and I will swim for three days. Until my legs get cramps and my hands can't move anymore against the deep blue water. At night, lying in bed, I will close my eyes and feel the circular motion of  the waves rocking my body over and over.


In order to calm myself down, I felt inspired to play with sea colors: lime and turquoise. My starting point was this ancient polka-dot box, where I keep my warranty papers from all the house appliances (gotta keep things organised around the house!). My star, as always, is the lovely blue pitcher with its plump belly. The tall turquoise container lives in my kitchen, as tortellini storage. The "tea" mug comes from a previous work place, and the lime one .... let's just say that I borrowed it.


What about that pink azalea topiary? Hmm.... she just happened to be in the right room, at the right time. She spreads her beauty like a satin queen, gracing the light with a touch of her soft pink petals. Azaleas are not supposed to last this long, they usually fade away during the last months of Spring. Anyway, I feel calmer now. Two more weeks. I can make it :)

Thursday, June 21, 2012

Beachy Photo Frames


Pin It


I can't wait to smell the salty sea and to loose myself into the blue! My summer gets hotter and hotter and my ache for an Ocean shack grows bigger and bigger. Only three weeks left until my trip to the seaside! I wouldn't miss it for the world. A summer without  a week of sunbathing, swimming and listening to the soothing waves is lost time.


Until I do get to the sunny shores, I whipped up a little something to remind me of the beach. I chose to upgrade three simple wooden IKEA frames, which were the perfect canvas for my summer mood. The beachy photo frames smile at me with a color trio of cooling white, pale blue and blonde wood. The sand and sea color scheme was enough to daydream, but I thought a little pattern never hurt anyone. Instead of adding a plethora of seashells, anchors, boats and sea horses, I went with dots and stripes - a very subtle reminder of seashells and sailors :)
They sit together happily, embracing my mushroom retro lamp. What more can I wish for?


The tutorial is so basic, that I will only mention the steps:
1. Prepare the surfaces you want to paint - the wooden frames should be clean and smooth;
2. For the striped picture frame, make a grid using painter's tape, then fill in the lines with a single thick coat;
3. For the aqua frame, paint the whole thing in the background color and let it dry properly;
4. Use a thin brush to paint the outline of every circle, then fill in with color and there you have your dots.


Update: The beachy frames have been featured at One Artsy Mama, A Little Knick Knack, Lovely Crafty Home, Faith, Trust and Pixie Dust, It's So Very Cheri, Katie's Nesting Spot , Mercy INK and Marvelously Messy. Thank you so much, lovely ladies, you make me happier than I can say!
  A Little Knick Knack  Lovely Crafty Home    A Marvelous Mess 
A Crafty Soiree  

LinkWithin

Related Posts Plugin for WordPress, Blogger...