
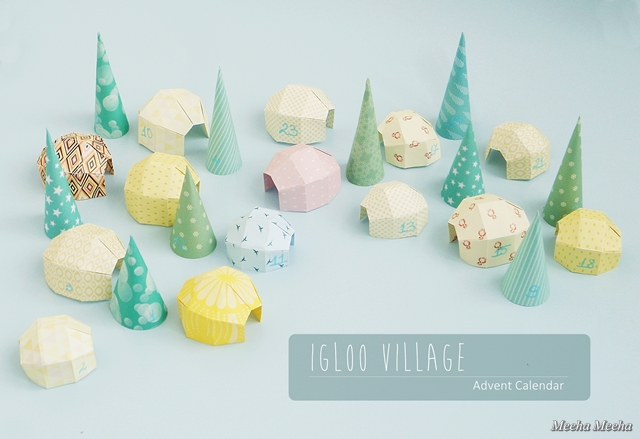

This year I thought I'd kill two birds with one stone with this DIY project: a Christmas village AND an Advent calendar. My first ideas were quite traditional, like making gingerbread houses. But after giving it a little thought, I decided to make something new and exciting: the Igloo Village! It's perfect for Christmas, since the igloos are always snowed in. And the round shapes of the ice homes are simply adorable :)

The Igloo Village is always in the mood for winter fun. It is made of origami paper, so it's light, small and easy to move around the home. Also, if it survives the holidays and the curiosity of my cats, it could be stored away in a small box, until next year. In theory, igloos are white - but mine are colorful, because when the sun shines across the endless sea of ice, the snow sparkles in soft tones of yellow, blue and even pink!

For the countdown to Christmas, I've made 24 little units: 14 origami igloos (in 2 sizes) and 10 paper trees (also in 2 sizes). Each item has its own number written on the side. The village display is random, so you need to find your next number, which adds a little to the excitement.

The Igloo village Advent calendar also doubles as a treasure hunt. Hide little treats, small messages, tree decorations or tiny toys under each house and tree. This way, the joy of Christmas gets sweeter every day! For me, it was toys all the way, as you can see in the image above. You can also use the paper igloos and trees to decorate the Christmas tree, if you hang them by a thread :)

Last but not least, I must tell you that the Igloo village looks great at night time, too! Since it is already pitch black each evening when I come back from work, it is a pleasure to take a peek at my Advent calendar, sitting quietly under the soft glow of a small lamp!

If you haven't got an Advent Calendar for this season yet, it's easy to replicate this one. I'm sharing the tutorial below, split in 2 parts: the igloos and the cone trees. It took me 3 hours to make the entire village, but prepare to spend a little more time if you're a novice in paper crafts in general and origami in particular.

Origami igloo tutorial
For this project you will need:
- origami igloo template: I used this great one from the talented Francesco Guarnieri.
- patterned square origami paper. I worked with two sizes: 8.5 x 8.5 cm square sheets and 10 x 10 cm square sheets.
- pencil and ruler for marking where you need to fold the paper.

How to make the origami igloo:
1. Lay the paper square on the blank side. Mark where you need to fold the paper in 5.
2. Start folding the paper in 5 equal strips horizontally, then in 4 equal strips vertically.
3. The folded paper should look like a grid.
4. Fold the extreme strips inside.
5. Fold again and make a little crease just like in the template.
6. Repeat another two times. The paper should look like this. Mark all the valley and mountain folds, for easy final assembling.
7. This is the tricky part: get the valley folds in one hand and flip it on the inside.
8. Carefully press the paper folds in order to make the final shape.
9. Repeat steps 7 and 8 on the other side of the igloo and you're done!

Paper trees tutorial
For this project you will need:
- cone tree template: I used these ones but in a smaller scale.
- patterned origami paper. The small trees fit into 8.5 x 8.5 cm square sheets and the tall ones fit into 10 x 10 cm square sheets.
- pencil and ruler for drawing the template outline and for marking where you need to fold the paper.
- scissors and glue stick.

How to make the paper tree:
1. Print the template on cardboard and cut it out. I didn't make the round base, just the cone. Lay the template on the blank side of the origami paper. Draw the outline. Be careful not to move the template during the process.
2. Cut out the origami paper, following the outline.
3. Fold the paper along the marked line.
4. Fold again on the other side. Apply glue on the patterned folded strip.
5. Turn the paper on the good side and put the edges together to make the cone shape. The long edge must overlap the glued strip. Gently press with your fingers until the glue sets in.
6. Enjoy the paper trees and the entire Igloo village!


