

This year I thought I'd kill two birds with one stone with this DIY project: a Christmas village AND an Advent calendar. My first ideas were quite traditional, like making gingerbread houses. But after giving it a little thought, I decided to make something new and exciting: the Igloo Village! It's perfect for Christmas, since the igloos are always snowed in. And the round shapes of the ice homes are simply adorable :)

The Igloo Village is always in the mood for winter fun. It is made of origami paper, so it's light, small and easy to move around the home. Also, if it survives the holidays and the curiosity of my cats, it could be stored away in a small box, until next year. In theory, igloos are white - but mine are colorful, because when the sun shines across the endless sea of ice, the snow sparkles in soft tones of yellow, blue and even pink!

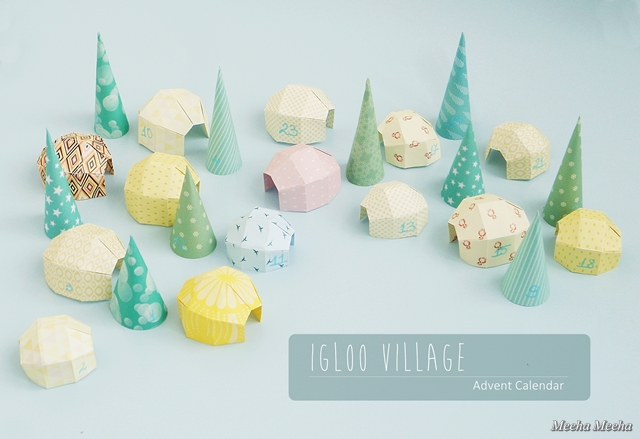
For the countdown to Christmas, I've made 24 little units: 14 origami igloos (in 2 sizes) and 10 paper trees (also in 2 sizes). Each item has its own number written on the side. The village display is random, so you need to find your next number, which adds a little to the excitement.

The Igloo village Advent calendar also doubles as a treasure hunt. Hide little treats, small messages, tree decorations or tiny toys under each house and tree. This way, the joy of Christmas gets sweeter every day! For me, it was toys all the way, as you can see in the image above. You can also use the paper igloos and trees to decorate the Christmas tree, if you hang them by a thread :)

Last but not least, I must tell you that the Igloo village looks great at night time, too! Since it is already pitch black each evening when I come back from work, it is a pleasure to take a peek at my Advent calendar, sitting quietly under the soft glow of a small lamp!

If you haven't got an Advent Calendar for this season yet, it's easy to replicate this one. I'm sharing the tutorial below, split in 2 parts: the igloos and the cone trees. It took me 3 hours to make the entire village, but prepare to spend a little more time if you're a novice in paper crafts in general and origami in particular.

Origami igloo tutorial
For this project you will need:
- origami igloo template: I used this great one from the talented Francesco Guarnieri.
- patterned square origami paper. I worked with two sizes: 8.5 x 8.5 cm square sheets and 10 x 10 cm square sheets.
- pencil and ruler for marking where you need to fold the paper.

How to make the origami igloo:
1. Lay the paper square on the blank side. Mark where you need to fold the paper in 5.
2. Start folding the paper in 5 equal strips horizontally, then in 4 equal strips vertically.
3. The folded paper should look like a grid.
4. Fold the extreme strips inside.
5. Fold again and make a little crease just like in the template.
6. Repeat another two times. The paper should look like this. Mark all the valley and mountain folds, for easy final assembling.
7. This is the tricky part: get the valley folds in one hand and flip it on the inside.
8. Carefully press the paper folds in order to make the final shape.
9. Repeat steps 7 and 8 on the other side of the igloo and you're done!

Paper trees tutorial
For this project you will need:
- cone tree template: I used these ones but in a smaller scale.
- patterned origami paper. The small trees fit into 8.5 x 8.5 cm square sheets and the tall ones fit into 10 x 10 cm square sheets.
- pencil and ruler for drawing the template outline and for marking where you need to fold the paper.
- scissors and glue stick.

How to make the paper tree:
1. Print the template on cardboard and cut it out. I didn't make the round base, just the cone. Lay the template on the blank side of the origami paper. Draw the outline. Be careful not to move the template during the process.
2. Cut out the origami paper, following the outline.
3. Fold the paper along the marked line.
4. Fold again on the other side. Apply glue on the patterned folded strip.
5. Turn the paper on the good side and put the edges together to make the cone shape. The long edge must overlap the glued strip. Gently press with your fingers until the glue sets in.
6. Enjoy the paper trees and the entire Igloo village!
Such a wonderful diy project. It looks so sweet.
ReplyDeleteThank you, my heart was full of joy when I was making the little igloos!
Deletevery cute project!
DeleteJe n'y arrive paspà l'igloo n°5 aidé moi s'ils vous plait
DeleteYou were so patient making these little igloos, but it was worth it, it's so cute!
ReplyDeleteThank you, Magali! I've been trying all weekend to put tea lights into the paper igloos, but it just doesn't work :)) If you ever feel like making origami, don't be afraid that it will take a lot of time - just try it and the time will fly away in the most enjoyable way!
DeleteJe comprends pas les 3 dernières étape de l'igloo
DeleteNice project! Love the idea :)
ReplyDeleteI never ever made an origami shape in my life, and since I am pretty sure I really can't make any of this, I will be comming to this post to enjoy this village often!
Please, Ana, try to make some origami with the children, maybe on a rainy Sunday afternoon! Working with paper is amazing, it is as relaxing as crocheting or sewing! You can start with a simple design and using a big 21x21 cm origami paper... you will see that origami captures you and steals you for hours... but it feels like endless fun!
DeleteGuauuu Meeha ,, the tenic origami is very dificult for my ,, great Job,,,is beautiful and delicate
ReplyDeleteso cute.
ReplyDeleteThank you, Erica! Please don't be fooled by the execution time - if you want to make the origami igloos, time will fly by so quickly!
DeleteThis is the cutest little advent calendar I have ever seen! Pinned it! Thank you for the fun tutorial, I have never tried origami. Your papers are so pretty!
ReplyDeleteDanni, you should try origami at least one time. Start with a simple design like a paper boat and use the biggest origami paper that you can find. Contrary to the popular belief, origami is not difficult at all!
DeleteThis is so unique! I absolutely love every detail of it! The color choices are super cool, too! Pinning!
ReplyDeleteAngela @ Number Fifty-Three
Aww, thank you for the pin, Angela :)
DeleteOh this is lovely Meeha! Absolutely lovely!
ReplyDeleteThank you, Andrea - I had lots of fun choosing the patterned paper and making the igloos!
Deletethis is seriously one of the cutest and most clever advent calendar ideas i have ever seen! i love the idea of the ornaments hiding inside too and adding one to the tree everyday - what a marvelous tradition this would make. oh i love this!! i want to pin this like 1000 times. xo
ReplyDeleteThank you so much for the pin, Christine! I admire your refined and airy taste, so this is a huge compliment for me :)
DeleteWhat a lovely, creative idea! Now that we live in Canada, it is a must-do project!
ReplyDeleteHooray for Canada! I can't wait to see your origami igloos! I live in Romania, Eastern Europe, but soon we will be snowed in just like you because we've got very cold winters :)
DeleteHow genius of you -- you know, that whole two birds with one stone crafting genius!!!
ReplyDeletePinning for sure!
Thanks so much for your amazing and fabulous inspiration!
:) Linda
Linda, thank a million for your lovely comment and for the pin - you surely know how to brighten up a girl's day!
DeleteWow .. what a creative and funny DIY! :D Very delicate colors on the sweet trees and igloos!
ReplyDeleteI think especially children will love this Advent calendar! :)
Thank you, Lisa! During the weekend all my friends visited me and saw the origami calendar - they are not kids anymore, but I think they liked it, too!
DeleteOh my, how cute is this?! I LOVE it :) And my son would love it too. Thanks for sharing, friend. Hugs to you!
ReplyDeleteThank you, Stephanie! Everyone seems to be frightened by how difficult origami could be - but I discovered origami at 8 years old and I think it's perfect for kids!
DeleteThis is so lovely and so unique! Great idea! Pinning :)
ReplyDeleteWould you like to share it at the Foodies & Crafties Soirée - http://goo.gl/u7aUKN? There is one each Thursday with a blog hop on different social media, so great way to gain some new followers:)
Hope to see you there! Gosia | Kiddie Foodies
I love this idea, and how you always use so beautiful colors and pastels :). Have a good Sunday sweetie :)
ReplyDeleteWhat an absolutely darling idea! So glad I saw your link-up at Flamingo Toes. I'm pinning your post and promoting a link on my FB fan page!
ReplyDeleteJenn/Rook No. 17
Thanks a million for the pin and the FB post, Jenn, this means a lot to me! Thanks again :)
DeleteOh my heavens, this is soooooo cute!
ReplyDeleteKelly at Little Wonders' Days
Thank you for the kind words, Kelly!
DeleteAdorable!! Love it!! :)
ReplyDeleteThank you so much for the lovely comment, Tracy!
DeleteSo beautiful!!! Love this! Thank for sharing! just wish I had time to do it.... :)
ReplyDeleteThank you for visiting, Anna! Origami is not very quick to make, but you don't feel the time passing by, so you should definitely try making the igloos some day!
DeleteThis is adorable! Pinned!
ReplyDeleteThanks a million for the pin, Rose, it means a lot to me!
DeleteSuch a cute project!
ReplyDeleteThank you so much for visiting, Shannon!
DeleteThis is beyond adorable. I'm a semi-paper fanatic so your project caught my eye immediately! I'd love for you to link up at our Link It or Lump It party!
ReplyDeletehttp://www.delineateyourdwelling.com/2013/11/link-it-or-lump-it-15.html
These igloos are too cute!! Such a fun advent calendar
ReplyDeleteOne of the cutest and thoughtful advent calendars I've seen! Pinning ;) Visiting from Carolyn's Homework linky ;)
ReplyDeleteCome visit me ;)
Ursula at http://kraftmint.com {modern crafts}
So clever!! The most unusual Christmas countdown I have ever seen!
ReplyDeleteWhat a beautiful novel idea. I love it! Thanks so much for linking up to Thriving on Thursdays. I'm featuring this post at tomorrow's party.
ReplyDeleteAnne xx
So smart and cute!
ReplyDeleteSherry
I just love this will feature tonight at Home Sweet Home!
ReplyDeleteSherry
This is the cutest thing ever! What a unique advent calendar! i love it :) http://www.handmadeintheheartland.com
ReplyDeleteSuch an original idea. You do all kinds of different games with it. Thank you for stopping by to our party. After all, we are all Balkan :)
ReplyDeleteSuch a fun and cute idea! So very creative. Thanks so much for sharing at Ivy and Elephants.
ReplyDeleteHave a happy and blessed Thanksgiving!
Hugs,
Patti
This is so fun! Thanks for sharing it at Monday Funday. Hope you are doing well!
ReplyDeleteAdorable! I love advent with the kids and new ideas like this are great! Thank you! You've been pinned, followed, and liked!
ReplyDelete@excuseourmess
love this supercute advent!! thanks for linking up to Serenity Saturday link party and i'll be featuring this tomorrow. Can't wait to see what you share tomorrow. Also now your newest follower
ReplyDeleteNatasha @ Serenity You
Cute, clever, & creative! Thanks for sharing at Submarine Sunday!!
ReplyDeleteThis is absolutely precious! What a great job you did and I love how since it's origami it's totally an affordable project. Nice job and thanks bunches for linking up at Link It or Lump It this week :)
ReplyDeleteOh, so lovely! :) Love the colours! I have shared it on my blog - of course you are credited and my post links back to your website. Thank you for sharing such a beautiful project, and big hugs from Sweden! :)
ReplyDeleteHI! I wanted to let you know that your DIY Advent Calendar Igloo Village has been featured by one of my co-hosts on the Link It or Lump It Link Party! Come on over and grab a button and don't forget to link up again this week! http://www.twoityourself.blogspot.com/2013/12/link-it-or-lump-it-party-16-plus.html
ReplyDeleteThanks!
Melissa @ Two It Yourself
So unique & cool (literally & figuratively!). You've been featured at this week's link party - stop by & grab a Featured On button. Thanks for linking to the Craftastic Monday party at Sew Can Do!
ReplyDeleteThis is so sweet and pretty! Thank you for sharing! You are one of the features at the Make it Pretty Monday party at The Dedicated House. Pop on in and grab a feature button. Here is the link to this week's party! http://thededicatedhouse.blogspot.com/2013/12/make-it-pretty-monday-week-78.html Hope to see your prettiness again at the bash! Toodles, Kathryn @TheDedicatedHouse
ReplyDeleteI am a complete paper freak so when I saw your advent calendar I was smitten! Just lovely. Thanks for making and sharing it. I gush over all things paper and the lost art of letter writing over at www.ritewhileucan.com I think you may enjoy.
ReplyDeleteSo cute!! This would make a great advent! Love this!! Thanks for linking up at Take it on Tuesday. Hope to see you this week!
ReplyDeleteVery very cool!!!!! Absolutely stunning!
ReplyDeleteWOW, WOW, WOW :)
ReplyDeleteI suppose I am not going to say anything that wasn't said already here!
WOW!
So pretty! :)))
Thanks so much for linking up to Your Whims Wednesday, I featued this on my blog today! Come stop by and grab a featured button: http://www.mygirlishwhims.com/2013/12/your-whims-wednesday-140-and-features.html
ReplyDeleteThese are so cute! I love it! I found you from your feature at The Life of Jennifer Dawn.
ReplyDeleteTammy @ thecoloreddoor.blogspot.com
Oh my goodness! This is fabulous! Thanks for linking up to Tickled Pink Times Two!! Featuring this tomorrow night :)
ReplyDeleteOh my goodness, this is incredible. I love your unique take on the advent calendar.
ReplyDeleteI found you on the Christmas and Holiday Party where I have the following projects linked;
Santa Gift Card Tutorial, and
Quilled Christmas Tree Tutorial
would love it if you'd stop by too.
Hugs, Antonella :-)
I was looking forward to showing how to do these to my elementary students but step 7 got the best of me. How to manipulate those folds need a bit more visual explanation. perhaps a video tutorial? Thanks
ReplyDeleteThis is so adorably cute I had to pin it for next year.
ReplyDeletefantastic! I plan to tackle this soon so I will be referring to it again!
ReplyDeleteWood pallets
I really appreciate the kind of topics you post here. Thanks for sharing us a great information that is actually helpful. Cyberpunk 2077 Jacket
ReplyDeleteOur the purpose is to share the reviews about the latest Jackets,Coats and Vests also shre the related Movies,Gaming, Casual,Faux Leather and Leather materials available Future Jacket Life is Good
ReplyDeletePretty good post. I have really enjoyed reading your blog posts.Any way Here I am Specialist in Manufacturing of Movies, Gaming, Casual, Faux Leather Jackets, Coats And Vests See Clint Eastwood Poncho
ReplyDeleteThis comment has been removed by the author.
ReplyDeleteSuch a Excellent Blog! I would Thanks for sharing this wonderful content. Its very useful to us. Luxury Hair Salons In Kolkata
ReplyDeleteYellowstone JacketsHave you ever considered writing an ebook or guest authoring on other blogs?
ReplyDeleteI have a blog based on the same ideas you discuss and would really like to have
you share some stories/information. I know my visitors would value your work.
If you are even remotely interested, feel free to shoot me an e
mail.
Have you ever considered writing an ebook or guest authoring on other blogs?
ReplyDeleteI have a blog based on the same ideas you discuss and would really like to have
you share some stories/information. I know my visitors would value your work. lakers jacket starter
If you are even remotely interested, feel free to shoot me an e
mail.
It is a Good Article Blog Thanks for Sharing.Thanks for sharing.
ReplyDeleteDubai yacht rental prices
Dubai yacht rental
Luxury yacht rental dubai
Yacht rental dubai
Yacht rental in dubai
Private yacht charter in dubai
The information you have very true and useful, thank you have shared this post.
ReplyDeleteBuy Instagram Followers In Delhi
DIY Advent Calendar: Igloo Village! is a 24-piece DIY puzzle that is the perfect holiday gift for the entire family. This beautifully illustrated puzzle includes a amazon copywritingvariety of scenes and animals that are sure to please all ages. The packaging is made of recycled paper, and is completely recyclable.
ReplyDeleteShop this best 1UP 2022 Vivian Lee Hoodie SHOP NOW
ReplyDeleteI love this! It's so easy, and I think it will be a great craft to share with my kids. Thanks for the idea! Cyberpunk Brown Bomber Jacket
ReplyDeletealmost all of what you say is astonishingly suitable and that makes me marvel the purpose why i had not checked out this in this mild formerly. This particular piece without a doubt did turn the mild on for me individually as far as this precise subject matter goes. However at the moment there is actually one specific factortogung.tribeplatform.com/general/post/onrain-bakara-geimeul-haegyeolhaneun-5gaji-cangyijeogin-bangbeob-f7kJqQ0TURlWYGq">토토궁검증업체
ReplyDeleteI have really enjoyed reading your blog posts.Very well written.Loved the way you explain about your blog.Thank you for sharing the information
ReplyDeletenice creativity..!!
Sean Astin Notre Dame Rudy Letterman Jacket
Thanks for sharing this amazing and informative post. keep sharing with us. https://topbusinessview.com/tips-to-choose-the-reliable-equipment-supplier/
ReplyDeleteStand out on any starship or starbase with this authentic Star Trek Picard Season 3 Field jacket.
ReplyDelete