Showing posts with label vases. Show all posts

Friday, November 15, 2013

Brown Bottle Fall Centerpiece


Pin It

It's the middle of November and we've been incredible lucky to have 3 weeks of Indian Summer here in beautiful Romania. The weekends were warm and sunny and we had a picnic every Sunday. I got home with a lot of fall clippings and wild herbs. Their colors are amazing: silver grey, soft honey brown and subtle lavender - so I decided to use them in a Fall centerpiece.


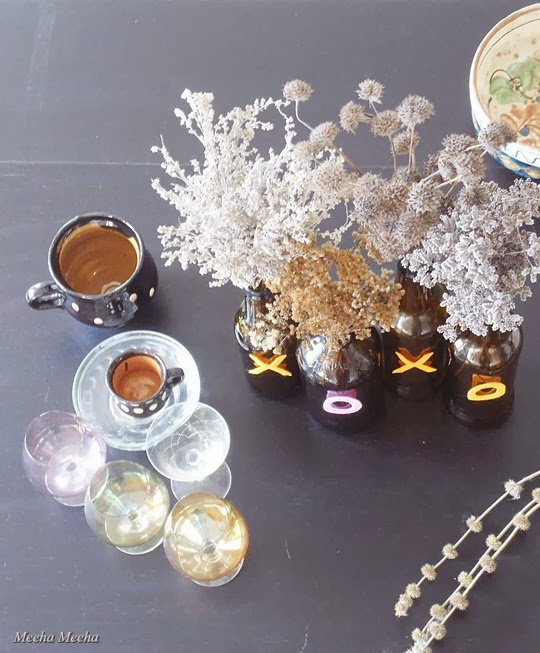
Let's take a normal look at the dining room table. That's better... The light colors of my clipped herbs needed some contrast, so I put them in brown bottles. The earth tones arrangement goes so well with the glowing Autumn light! I reached into my cupboards for the perfect companions: small brandy glasses in tinted hues, traditional pottery from my country and a tiny brown apothecary jar filled with spices.


Of course, an all-neutral-decor is too much for me to handle. I just can't do it. It may be classic, timeless, effortless and perfectly elegant, but it just isn't my style. So I added a little twist to my brown bottle centerpiece: a kiss made of pink and orange felt letters. Now we're talking!


This little DIY can be made and re-made in so many ways! For my friends in the USA, the letters could say "THANKS" - it would make a great centerpiece for Thanksgiving! For my European friends, you could spell "AUTUNNO" or something similar. Spot the differences in the 2 images from above! You can leave the bottles standing solo, as well as decorate with additional items - either way, the centerpiece still looks great.


Styling tip: play a little with the height of the bottles. Make the arrangement more interesting and invite the eye to travel across the table by assorting slightly different items. As you can see, I used 3 different sizes. Also, play with the height and dimensions of the flowers / fall clippings. You can create the WOW! effect if you vary the bouquets (some larger, some taller, some smaller) instead of repeating the same bunch of flowers in every bottle. 


Brown bottle centerpiece tutorial:
1. Choose your felt in one o more colors. Trace the outline of your letters, using a marker. The thicker the marker the better (felt is not easy to draw on!).
2. Cut the felt letters with a sharp tool. Make sure that the marker outline is not visible on the final letters. 
3. Use a needle & thread to make a chain around each bottle, each one holding a letter. You can also glue the felt letters directly on the bottles, but I like the thread better, because it looks more loose (and I can simply re-use the brown bottles later).
4. Stick the fall clippings in the bottles and enjoy your Fall centerpiece!


Wednesday, November 6, 2013

How To Force Bulbs For Christmas


Pin It

Wow, it's November already! 
Yay! This means that "Christmas preparations" season is officially open in my home. I've already made up my mind about what colors to use for the holidays. And the hyacinth bulbs are already being forced tricked to be in full bloom for the magic evening of December the 24th. 
Having tiny paper-whites and hyacinths and crocus flowers in the middle of the winter season feels wonderful. Need proof? These are my little touches of life from last year (yes, I stumbled upon these old pics and thought they would make a great tutorial). I advise everyone to buy some bulbs and force them to bloom. First you need to chill the bulbs in the fridge for 4-6 weeks. Better yet, you can buy pre-chilled bulbs almost everywhere nowadays! Just follow these VERY simple steps:


1. Fill a tiny vase with gravel. Instead of gravel, you may use rocks or clay pellets. Or just use gardening soil.
2. Fill the vase with water. Make sure you use clean, filtered water. If you pour tap water directly into the vase, the chlorine in the water will damage the plants. For chlorine-free water, pour tap water into a bottle and let it "breathe" for 3 days - and the chlorine will slowly evaporate (so don't close the bottle!).


3. Put the bulb on top of the gravel (if you use a larger pot, squeeze in as many bulbs as you can, depending on their size). Make sure that the bottom of the bulb doesn't touch the water (or else the bulb will rot and then it's goodbye, beautiful hyacinths!)
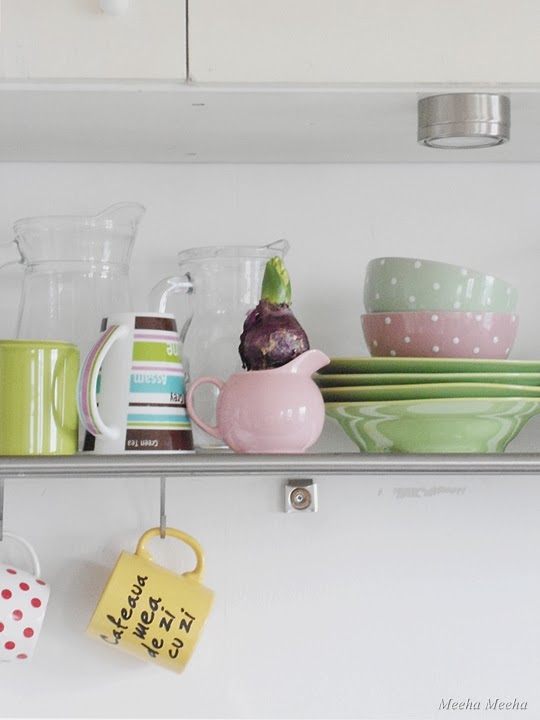
4. Special note for bloggers: If you think that your bulbs are too beautiful to be stacked away for a few weeks, now is your chance to grab them and make a few arrangements and photos, before they start growing roots. I couldn't help myself and made a vignette using kitchen bowls and the DIY washi tape vase :)


5. Leave the bulbs in a cool, dry place. I put mine in the cabinet on the balcony, which is the coldest corner of the apartment. After 10 days, little roots were starting to show already. Maintain the water level by adding a few drops now and then - always making sure that the water doesn't touch the bulbs.
6. When the leaves are already a few inches tall, you can move the hyacinths some place warm and sunny.


For example, my Christmas bulb came to live with us on the kitchen shelf. We admired its delicate beauty in all the stages. Watching a plant grow little by little every day and forming blooms under your very eyes - priceless! So hurry up and buy your own bulbs if you haven't done it already, because Christmas is coming in just 8 weeks :)


Tuesday, April 16, 2013

The Textile Vase


Pin It

I think that no matter how much we admire their endless beauty, flowers are still underestimated. There is simply no measure for the wonder of flowers. Each time I take pics of flowers, I get lost... I could shoot them all day long (and then some more). So I always search new and improved ways to make flower arrangements - this time it's an impromptu fabric vase!


It all started with this wonderful  little pouch - a gift from my Norwegian friend Lisa from Lisa Sol. She is one extraordinary lady, who's love for beauty and keen eye for detail never cease to amaze me. She sent me the little pouch as a gift, after we just bonded on the Internet. Thank you, Lisa, one more time, I wish every one could see all the perfection of every millimeter of this little textile jewel!


My adorable pouch has got 4 large pockets, so I can store inside jewelry, colorful beads, small trinkets or anything my heart desires - in a very organized way! But I wanted to show off the pouch a little more, so I transformed it into a textile vase, the star of my tea party. I was very careful not to damage the pouch - see how I've done it at the end of this post!


The spring weather was rainy and sad, so when the sun finally came through I had this urge to celebrate. With cake. Chocolate cake, to be precise - lots of chocolate, please! There was a small Russian doll invited to the party, a hyacinth planted in my pink creamer and a china set from .... China, that my parents got as a wedding gift in 1975.


The centerpiece for this small tea party is made of spring flowers: freesias and tulips in assorted colors. They smell so fresh! I also made a little trick on the table - I put the textile vase up high on an upside bowl, just like a pedestal, in order to add some height for the little pouch and to make it stand out among the tea cups.


So here is the tutorial for making a textile vase. For this little project you'll need a bunch of assorted flowers, a fabric pouch, florist foam, a clear plastic roll and scissors.
1. Cut a cube from the florist foam and let it soak in water. Cut a large piece of plastic roll and wrap the wet florist foam, three times, so that the water never touches the fabric.
2. Cut all the flowers short and insert them into the foam cube. Start with the biggest blooms (in my case, the tulips) and spread them evenly. Fill in the gaps using the smaller flowers (in my case, I filled it up with freesias, until I had a round arrangement).
3. Insert the bouquet into the pouch - very carefully! Then close the pouch and never open it again until the next day, when you'll need to add a little water into the foam. Enjoy your unusual spring centerpiece!


Yay, the textile vase has just been featured at Smart School House, Creating My Way To Success, Handmade Cuddles and JAQS Studio. Thanks a million for the feature!

Wednesday, January 30, 2013

Quick DIY: Romantic Vase (and Washi Tape)


Pin It

This little DIY project literally takes 2 minutes to make! Naturally, simple things are my favorite, but in view of the upcoming Valentine's Day, I found myself longing for some soft colors. Ultra-feminine decor is not my usual cup of tea, but these days I was in the mood for upgrading a simple Ikea vase. I like its curvy shapes and its perfect proportions, and now I added some casual color.


As painting the little vase was not an option (I'd really like to have my simple glass vase back, thank you very much!), I reached into my DIY supply for some light purple washi tape. You just gotta looove washi tape - it sticks in seconds and you can wash the romantic vase without damaging your new piece of art. This won't leave any marks, either, once I try to remove it.


The romantic vase goes best with... well, roses. You may say anything you want, I guess that nothing beats roses when it comes to soft, feminine, glamorous vignettes. Against all odds, I decided to shoot the vase in contre-jour, just as it was in my living room corner, next to a pink pitcher full of milk. The way the light travels through the transparent light, disperses in the water and eludes the washi tape lines is lovely to look at.


Thursday, June 7, 2012

Chalk Paint Vases


Pin It

I took a couple of old crystal vases and gave them a brutal paint job. They look clean, chalky and perfect for my whimsy Wednesday afternoon. The paint crawled into the crystal vase crevasses, maintaining a subdued pattern. So now I've got extra texture - which is a subtle way to a luxurious decor.


Most of all, I LOVE that the inside is still intact - little dark crystal flower:


And back to the flowers:


You get the idea - I like them a lot!

And for the grand finale, a quick tutorial:
1. Wash the vases and dry them. Check for impurities.
2. Apply the first paint coat using a very wide brush, in order to sweep the curvy vase lines. The brush must also be a thin one, because you need to reach into the little sculpted details.
3. Repeat for the other vase. The second one always turns out better :D
4. Let the vases dry completely and complete with a thinner second layer of paint (and even a third one, if necessary, but careful not to damage the vase pattern!)


UPDATE: I've been featured at Little InspirationThe Sasse Life and Candance Creations! Thank you, thank you, thank you, I'm happier than I can say :)
   Candace Creations

LinkWithin

Related Posts Plugin for WordPress, Blogger...