Showing posts with label christmas. Show all posts

Monday, February 10, 2014

Never-Ending Christmas


Pin It

Hello, dear friends, it's great to be back online! I hope you all had a wonderful time during the winter holidays and that this new year is already on the right track for each one of you, with exciting surprises and new projects!
Please don't be alarmed by the title of this post, ha ha! I KNOW it's been 6 weeks since Christmas, but for me it feels wonderful even now, for a number of good reasons:
a) In January I've received many incredible heart-felt and hand-crafted gifts from my best friends online (and this post is all about the gifts!)
b) My circle of friends feels like the best family ever - and despite our real job during the week days, we've managed to spend lots of time together in impromptu evenings and long board-game session during the weekends. So my days are full;
c) Like any weather-dependent Leo, the grey skies and cold weather make me sleepy... and lazy (for which I am very, very sorry!).

So, back to my presents: the first one to come (pictured above) was from Ana-Marija from Carpe Diem, the lady with the greatest smile in the world. She overwhelmed me, by making these adorable softies just for me, go figure! The gingham cats are meant to be a window treatment, so stay around and I'll show you where these cuddly felines are residing in my home!


Next, another incredible surprise, which left me speechless: the whimsical heart with a twist, hand made by lovely Lisa from Lisa Sol. Dusty pink, delicate lace and a handsome button - this is now my key ingredient to my Valentines decor in the little apartment.


And just when I thought it couldn't get any better, here comes a little package sent by Ann from Love Making Things. She included a beautiful hand-printed card which makes me ready for the next summer, one of her famous handmade ornaments (yes: it is gingham, again - and it's a heart, again! The stars aligned...) and as a bonus the cutest gift tags. They were on sale at M&S and she couldn't help herself - I understand it too well, Ann!

So these are my presents from Croatia, Norway and UK. A never-ending Christmas full of wonder - I just put away the Xmas decorations like 5 days ago. I've taken lots and lots of pics (with my new DSLR, which I don't know how to use properly) so I can't wait to share the new details of my home with you!


Thursday, December 26, 2013

Merry Christmas 2013!


Pin It

Merry Christmas, dear friends! I hope that you've already had that moment of total bliss, when you're surrounded by the peace and love of family and friends! After busy days at the end of the year, hectic shopping sessions, lots of cooking and crazy decor preparations, we all deserve the untouchable, ethereal, blissful magic of Christmas <3

Wednesday, December 18, 2013

Still In Love With The White Christmas Tree


Pin It

Wait for it...


Wait for it...


Here it is! I'm still happy to have the little white Christmas tree in the living room!


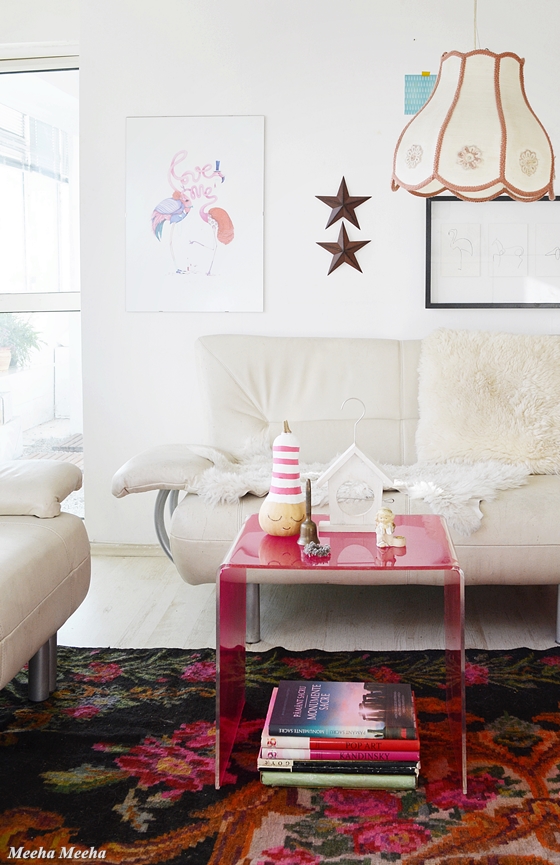
Now that the little Christmas tree is out of its box once again and the felines are busy killing it, let's go back to the Holiday preparations! My newest acquisition are the two metal Christmas stars hanging on the gallery wall. Made in Germany :) I usually stay away from brown, but I love the way these brown stars echo the trim of the granny lamp.  


There's lots of pink going on here, topped with one of the Sleepy pumpkins I've made for Halloween. Many of you suggested it would be perfect for a Christmas decor, so here it is! I've added a vintage bell - a bronze buddy for the stars on the wall. Plus, I've split the white-washed wooden bird houses on both pink coffee tables (one of which serves as a side table, actually, it's more functional this way).


My cat Junior is not impressed with the way the sun rays play with the branches of the white tree. Oh well, what does he know about the trials and tribulations of a decorating addict!


Looking at these pics, I'm so far from a Christmas-y decor, but I really like it this way. Now I need to figure out what ornaments to put in the tree, so that the cats won't eat them :))


Tuesday, December 10, 2013

Wild Herbs Christmas Wreath


Pin It

Hello, dear friends, I'm excited to announce that I've made my first DIY wreath ever! So I would like to apologize in advance, because this post is gonna have LOTS of pictures...
I've been dreaming of making a wreath since 2005, when I was just entering the fabulous world of interior design blogs. We don't have many wreaths in Romania (and there are no supplies at the craft stores) and I have always been afraid to make one. I was convinced that the leaves would fall off and that the wire base would show...

For my first wreath I wanted the real deal: real natural plants, no plastic allowed. Long story short, we went to a picnic in the middle of November, on a sunny hill at the edge of a beautiful forest. There were lots of wild herbs, which we call "immortal" because they dry out in the field and stay like this forever. I filled the trunk of my car with a bunch of herbs in awesome shades of silver, soft brown and pale lavender. Plus a few thistles. Perfect materials for a natural wreath :)


The natural herb Christmas wreath sits in the bedroom, hanging by a traditional red and white ribbon. It complements the other flowers who live by the bedroom window: a small white Saint Paulia and three orchids which are getting ready to bloom in a couple of weeks. 


Initially, I was going to make the simplest wreath design possible. At the last minute, I've decided to add a little twist to my simple wreath, so I placed the thistles in a small bouquet on one side. A little "bling" goes a long way :)


I've kept the bedding white and full of texture, combining natural white cotton sheets with linen and sheep skin pillows. It tickles the senses and lets the Christmas wreath steal the show. Each morning I smile thinking that I live in a bohemian hotel in Paris :)


How to make a Christmas wreath
If you are like me, a novice in wreath making and a little afraid to try it, I've got 3 words for you: Just do it! I'll guide you every step of the way with my DIY wreath tutorial:
1. Gather your materials: natural plants, scissors and wire. That's all you need!
2. Use a wreath base (you can find them in stores) or make one yourself, from electric cord or thick wire.
3. Make a small bouquet and tie it with floral wire. Make the front line flowers smaller than the ones in the back and spread them like a fan. Layer the colors by height: I put the short brown twigs in the front, then the longer lavender ones and kept the tall silver ones in the back.
4. Cut off the extra length of the branches. My bouquets are 10 cm (4 inches) long.
5. Make an extra bouquet from different branches for the wreath's graphic accent.
6. Repeat step no. 3 and 4 until you run out of stuff. I've made exactly 30 small bouquets.
7. Attach the first bouquet to the wreath base and secure it with wire. Make sure that the bouquet is on the outside of the base curve.
8. Continue with the rest of the bouquets, just like you did with the first one. Don't be afraid to squeeze them together - this way you make sure that the base will be fully covered.
9. This is how the wreath looks when you turn it over. Add some pretty ribbon and enjoy!


Linking up to these lovely parties.
And some of them require a backlink in the actual post, so here they are:
http://adiamondinthestuff.blogspot.ro/   http://www.myuncommonsliceofsuburbia.com/   http://www.blackberryvine.blogspot.ro/   http://www.cedarhill-ranch.com/   http://diycraftyprojects.com
http://www.sew-much-ado.com/   http://www.elizabethandco.blogspot.ro/   http://thelifeofjenniferdawn.blogspot.ro/

Friday, December 6, 2013

Printable Bauble Gift Tags


Pin It

Dear friends, here is a little gift for those of you in need of a breath of fresh air (and free gift tags). I'm sharing some care-free tags for some last minute casual gift wrapping. If you're overwhelmed by the invasion of free gift tags featuring cute Christmas trees, Santa, Rudolf and so on, or if you need a shift from tradition, you can use my alternative gift tags, based of my own photos from the blog. The tags are free to download here


My free gift tags are less conventional, but they still fit into the Christmas feel. I've made 10 different designs, each one shaped like a bauble ornament. So basically they can be printed and hung in the Christmas tree, why not?!  The tags come in different colors, so they can be assorted to many kids of wrapping paper.


For a neat look, wrap your gifts in solid color paper (or craft paper, I bet it would look terrific!) and hang the bauble gift tags by a piece of yarn in a matching color. I went the extra mile and wrapped my gifts in ombre shades of mint. The vivid colors of the gift tags will stand out from the crowd :)


Or you can go crazy and choose a busy patterned wrapping paper and some neon string. Hang a bunch of gift tags on the same present, instead of just one. It looks like fun!


If you're curious to discover from which of my blog posts I've taken the photos, take a peak here:
1. Orange and purple flowers from the Autumn Flower Ball tutorial
2. The inside of a crystal Chalk Paint Vase
3. The inside of a blue vase from my Sand, Sea and Sky shooting
4. Apple shaped gravel from What To Do?
5. Red peony petals from Don't Play With Your Food
6. A snowflake made of mini pegs in Winter Valentine
7. Hyacinth bulbs from How To Force Bulbs For Winter
8. Painted toothpics in the process of making Mad Hatter Cupcake Toppers
9. 3. The inside of a yellow vase, also from my Sand, Sea and Sky shooting
10. A snowflake of paper boats from my Origami Garland


 If you have any questions, just let me know. This printable is provided for personal, non-commercial use only. Enjoy!

Linking up to these lovely parties.
And some of them require a backlink in the actual post, so here they are:
http://adiamondinthestuff.blogspot.ro/   http://www.myuncommonsliceofsuburbia.com/   http://www.blackberryvine.blogspot.ro/   http://www.cedarhill-ranch.com/   http://diycraftyprojects.com
http://www.sew-much-ado.com/   http://www.elizabethandco.blogspot.ro/   http://thelifeofjenniferdawn.blogspot.ro/

Tuesday, December 3, 2013

Quick DIY: Toy Christmas Tree


Pin It

This one is a no-brainer: get the Christmas toys out of the box and hang them directly on the wall using poster tack. Just make sure the toys form a Xmas tree shape! I was done in less than 3 minutes :)


Just like I told you, I was going through the Christmas box, which sits on the balcony all year long. I was debating whether the toys were tiny enough to fit into my tiny white Christmas tree, when I got struck by nostalgia. All of these toys come from my parents' house - I've had these toys for 30 years! They don't make toys like this anymore... So I made a quick toy tree above the bed, an homage to my family and the good times we had <3

PS: I just realized that at the base of the tree you can see the most unique pumpkin, a hand painted gift from the talented Anna, the creative smile behind Tulimami. Grazie, Anna!

Linking up to these lovely parties.
And some of them require a backlink in the actual post, so here they are:
http://adiamondinthestuff.blogspot.ro/   http://www.myuncommonsliceofsuburbia.com/   http://www.blackberryvine.blogspot.ro/   http://www.cedarhill-ranch.com/   http://diycraftyprojects.com
http://www.sew-much-ado.com/   http://www.elizabethandco.blogspot.ro/   http://thelifeofjenniferdawn.blogspot.ro/

Wednesday, November 20, 2013

DIY Advent Calendar: Igloo Village!


Pin It

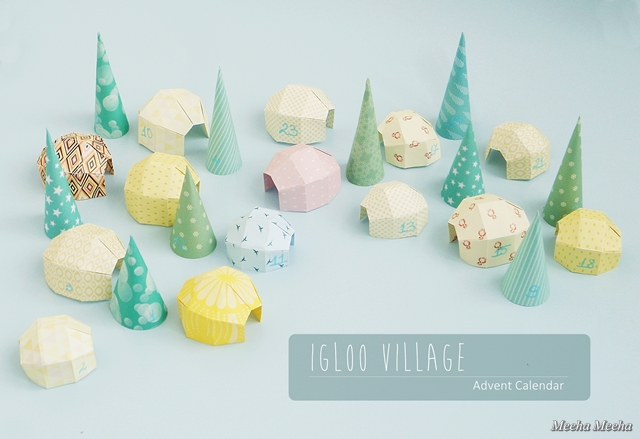
This year I thought I'd kill two birds with one stone with this DIY project: a Christmas village AND an Advent calendar. My first ideas were quite traditional, like making gingerbread houses. But after giving it a little thought, I decided to make something new and exciting: the Igloo Village! It's perfect for Christmas, since the igloos are always snowed in. And the round shapes of the ice homes are simply adorable :)


The Igloo Village is always in the mood for winter fun. It is made of origami paper, so it's light, small and easy to move around the home. Also, if it survives the holidays and the curiosity of my cats, it could be stored away in a small box, until next year. In theory, igloos are white - but mine are colorful, because when the sun shines across the endless sea of ice, the snow sparkles in soft tones of yellow, blue and even pink!


For the countdown to Christmas, I've made 24 little units: 14 origami igloos (in 2 sizes) and 10 paper trees (also in 2 sizes). Each item has its own number written on the side. The village display is random, so you need to find your next number, which adds a little to the excitement. 


The Igloo village Advent calendar also doubles as a treasure hunt. Hide little treats, small messages, tree decorations or tiny toys under each house and tree. This way, the joy of Christmas gets sweeter every day! For me, it was toys all the way, as you can see in the image above. You can also use the paper igloos and trees to decorate the Christmas tree, if you hang them by a thread :)


Last but not least, I must tell you that the Igloo village looks great at night time, too! Since it is already pitch black each evening when I come back from work, it is a pleasure to take a peek at my Advent calendar, sitting quietly under the soft glow of a small lamp! 


If you haven't got an Advent Calendar for this season yet, it's easy to replicate this one. I'm sharing the tutorial below, split in 2 parts: the igloos and the cone trees. It took me 3 hours to make the entire village, but prepare to spend a little more time if you're a novice in paper crafts in general and origami in particular.


Origami igloo tutorial
For this project you will need:
- origami igloo template: I used this great one from the talented Francesco Guarnieri.
- patterned square origami paper. I worked with two sizes: 8.5 x 8.5 cm square sheets and 10 x 10 cm square sheets.
- pencil and ruler for marking where you need to fold the paper.


How to make the origami igloo:
1. Lay the paper square on the blank side. Mark where you need to fold the paper in 5.
2. Start folding the paper in 5 equal strips horizontally, then in 4 equal strips vertically.
3. The folded paper should look like a grid.
4. Fold the extreme strips inside.
5. Fold again and make a little crease just like in the template.
6. Repeat another two times. The paper should look like this. Mark all the valley and mountain folds, for easy final assembling.
7. This is the tricky part: get the valley folds in one hand and flip it on the inside.
8. Carefully press the paper folds in order to make the final shape.
9. Repeat steps 7 and 8 on the other side of the igloo and you're done!


Paper trees tutorial
For this project you will need:
- cone tree template: I used these ones but in a smaller scale.
- patterned origami paper. The small trees fit into 8.5 x 8.5 cm square sheets and the tall ones fit into 10 x 10 cm square sheets.
- pencil and ruler for drawing the template outline and for marking where you need to fold the paper.
- scissors and glue stick.


How to make the paper tree:
1. Print the template on cardboard and cut it out. I didn't make the round base, just the cone. Lay the template on the blank side of the origami paper. Draw the outline. Be careful not to move the template during the process.
2. Cut out the origami paper, following the outline.
3. Fold the paper along the marked line.
4. Fold again on the other side. Apply glue on the patterned folded strip.
5. Turn the paper on the good side and put the edges together to make the cone shape. The long edge must overlap the glued strip. Gently press with your fingers until the glue sets in.
6. Enjoy the paper trees and the entire Igloo village!


Wednesday, November 6, 2013

How To Force Bulbs For Christmas


Pin It

Wow, it's November already! 
Yay! This means that "Christmas preparations" season is officially open in my home. I've already made up my mind about what colors to use for the holidays. And the hyacinth bulbs are already being forced tricked to be in full bloom for the magic evening of December the 24th. 
Having tiny paper-whites and hyacinths and crocus flowers in the middle of the winter season feels wonderful. Need proof? These are my little touches of life from last year (yes, I stumbled upon these old pics and thought they would make a great tutorial). I advise everyone to buy some bulbs and force them to bloom. First you need to chill the bulbs in the fridge for 4-6 weeks. Better yet, you can buy pre-chilled bulbs almost everywhere nowadays! Just follow these VERY simple steps:


1. Fill a tiny vase with gravel. Instead of gravel, you may use rocks or clay pellets. Or just use gardening soil.
2. Fill the vase with water. Make sure you use clean, filtered water. If you pour tap water directly into the vase, the chlorine in the water will damage the plants. For chlorine-free water, pour tap water into a bottle and let it "breathe" for 3 days - and the chlorine will slowly evaporate (so don't close the bottle!).


3. Put the bulb on top of the gravel (if you use a larger pot, squeeze in as many bulbs as you can, depending on their size). Make sure that the bottom of the bulb doesn't touch the water (or else the bulb will rot and then it's goodbye, beautiful hyacinths!)
4. Special note for bloggers: If you think that your bulbs are too beautiful to be stacked away for a few weeks, now is your chance to grab them and make a few arrangements and photos, before they start growing roots. I couldn't help myself and made a vignette using kitchen bowls and the DIY washi tape vase :)


5. Leave the bulbs in a cool, dry place. I put mine in the cabinet on the balcony, which is the coldest corner of the apartment. After 10 days, little roots were starting to show already. Maintain the water level by adding a few drops now and then - always making sure that the water doesn't touch the bulbs.
6. When the leaves are already a few inches tall, you can move the hyacinths some place warm and sunny.


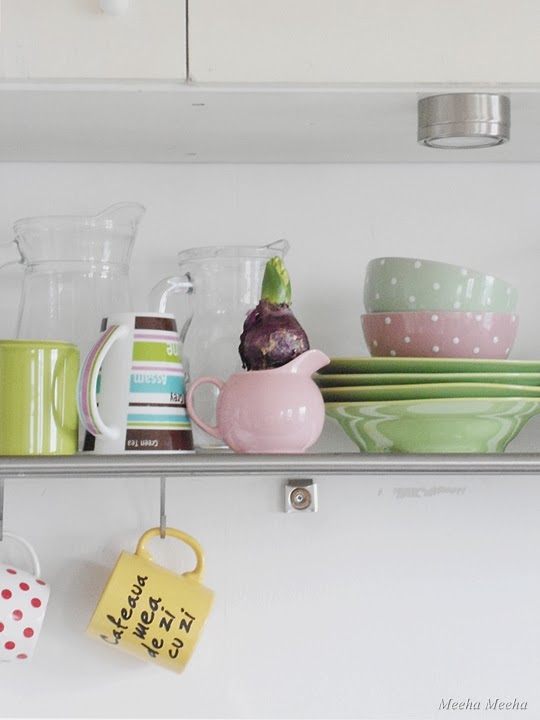
For example, my Christmas bulb came to live with us on the kitchen shelf. We admired its delicate beauty in all the stages. Watching a plant grow little by little every day and forming blooms under your very eyes - priceless! So hurry up and buy your own bulbs if you haven't done it already, because Christmas is coming in just 8 weeks :)


LinkWithin

Related Posts Plugin for WordPress, Blogger...