Showing posts with label paper. Show all posts

Friday, December 6, 2013

Printable Bauble Gift Tags


Pin It

Dear friends, here is a little gift for those of you in need of a breath of fresh air (and free gift tags). I'm sharing some care-free tags for some last minute casual gift wrapping. If you're overwhelmed by the invasion of free gift tags featuring cute Christmas trees, Santa, Rudolf and so on, or if you need a shift from tradition, you can use my alternative gift tags, based of my own photos from the blog. The tags are free to download here


My free gift tags are less conventional, but they still fit into the Christmas feel. I've made 10 different designs, each one shaped like a bauble ornament. So basically they can be printed and hung in the Christmas tree, why not?!  The tags come in different colors, so they can be assorted to many kids of wrapping paper.


For a neat look, wrap your gifts in solid color paper (or craft paper, I bet it would look terrific!) and hang the bauble gift tags by a piece of yarn in a matching color. I went the extra mile and wrapped my gifts in ombre shades of mint. The vivid colors of the gift tags will stand out from the crowd :)


Or you can go crazy and choose a busy patterned wrapping paper and some neon string. Hang a bunch of gift tags on the same present, instead of just one. It looks like fun!


If you're curious to discover from which of my blog posts I've taken the photos, take a peak here:
1. Orange and purple flowers from the Autumn Flower Ball tutorial
2. The inside of a crystal Chalk Paint Vase
3. The inside of a blue vase from my Sand, Sea and Sky shooting
4. Apple shaped gravel from What To Do?
5. Red peony petals from Don't Play With Your Food
6. A snowflake made of mini pegs in Winter Valentine
7. Hyacinth bulbs from How To Force Bulbs For Winter
8. Painted toothpics in the process of making Mad Hatter Cupcake Toppers
9. 3. The inside of a yellow vase, also from my Sand, Sea and Sky shooting
10. A snowflake of paper boats from my Origami Garland


 If you have any questions, just let me know. This printable is provided for personal, non-commercial use only. Enjoy!

Linking up to these lovely parties.
And some of them require a backlink in the actual post, so here they are:
http://adiamondinthestuff.blogspot.ro/   http://www.myuncommonsliceofsuburbia.com/   http://www.blackberryvine.blogspot.ro/   http://www.cedarhill-ranch.com/   http://diycraftyprojects.com
http://www.sew-much-ado.com/   http://www.elizabethandco.blogspot.ro/   http://thelifeofjenniferdawn.blogspot.ro/

Wednesday, November 20, 2013

DIY Advent Calendar: Igloo Village!


Pin It

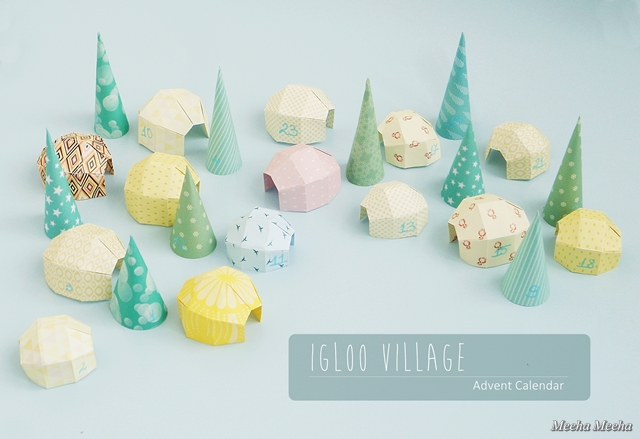
This year I thought I'd kill two birds with one stone with this DIY project: a Christmas village AND an Advent calendar. My first ideas were quite traditional, like making gingerbread houses. But after giving it a little thought, I decided to make something new and exciting: the Igloo Village! It's perfect for Christmas, since the igloos are always snowed in. And the round shapes of the ice homes are simply adorable :)


The Igloo Village is always in the mood for winter fun. It is made of origami paper, so it's light, small and easy to move around the home. Also, if it survives the holidays and the curiosity of my cats, it could be stored away in a small box, until next year. In theory, igloos are white - but mine are colorful, because when the sun shines across the endless sea of ice, the snow sparkles in soft tones of yellow, blue and even pink!


For the countdown to Christmas, I've made 24 little units: 14 origami igloos (in 2 sizes) and 10 paper trees (also in 2 sizes). Each item has its own number written on the side. The village display is random, so you need to find your next number, which adds a little to the excitement. 


The Igloo village Advent calendar also doubles as a treasure hunt. Hide little treats, small messages, tree decorations or tiny toys under each house and tree. This way, the joy of Christmas gets sweeter every day! For me, it was toys all the way, as you can see in the image above. You can also use the paper igloos and trees to decorate the Christmas tree, if you hang them by a thread :)


Last but not least, I must tell you that the Igloo village looks great at night time, too! Since it is already pitch black each evening when I come back from work, it is a pleasure to take a peek at my Advent calendar, sitting quietly under the soft glow of a small lamp! 


If you haven't got an Advent Calendar for this season yet, it's easy to replicate this one. I'm sharing the tutorial below, split in 2 parts: the igloos and the cone trees. It took me 3 hours to make the entire village, but prepare to spend a little more time if you're a novice in paper crafts in general and origami in particular.


Origami igloo tutorial
For this project you will need:
- origami igloo template: I used this great one from the talented Francesco Guarnieri.
- patterned square origami paper. I worked with two sizes: 8.5 x 8.5 cm square sheets and 10 x 10 cm square sheets.
- pencil and ruler for marking where you need to fold the paper.


How to make the origami igloo:
1. Lay the paper square on the blank side. Mark where you need to fold the paper in 5.
2. Start folding the paper in 5 equal strips horizontally, then in 4 equal strips vertically.
3. The folded paper should look like a grid.
4. Fold the extreme strips inside.
5. Fold again and make a little crease just like in the template.
6. Repeat another two times. The paper should look like this. Mark all the valley and mountain folds, for easy final assembling.
7. This is the tricky part: get the valley folds in one hand and flip it on the inside.
8. Carefully press the paper folds in order to make the final shape.
9. Repeat steps 7 and 8 on the other side of the igloo and you're done!


Paper trees tutorial
For this project you will need:
- cone tree template: I used these ones but in a smaller scale.
- patterned origami paper. The small trees fit into 8.5 x 8.5 cm square sheets and the tall ones fit into 10 x 10 cm square sheets.
- pencil and ruler for drawing the template outline and for marking where you need to fold the paper.
- scissors and glue stick.


How to make the paper tree:
1. Print the template on cardboard and cut it out. I didn't make the round base, just the cone. Lay the template on the blank side of the origami paper. Draw the outline. Be careful not to move the template during the process.
2. Cut out the origami paper, following the outline.
3. Fold the paper along the marked line.
4. Fold again on the other side. Apply glue on the patterned folded strip.
5. Turn the paper on the good side and put the edges together to make the cone shape. The long edge must overlap the glued strip. Gently press with your fingers until the glue sets in.
6. Enjoy the paper trees and the entire Igloo village!


Friday, October 25, 2013

Black Cat Doodles


Pin It

Yesterday's post about a minimalist Halloween vignette - featuring just an over-sized picture of a spooky black cat - reminded me of the sinuous path from doodles to a finished item. So look what I've found, after rummaging through tons of photos taken in my first year of blogging! Doodles of a very, very surprised black cat, scribbled by yours truly in the middle of my morning "black coffee and sudoku" routine.


I liked the black cat doodles a lot, so I decided to use it as a sketch for a greater piece of art. It took me less than 20 minutes to trace the design on black color block cardboard and to carve out the big black cat, with my scissors. I also made a small version of it - a decoupage cat for which I used (oh, the irony!) a hilarious scrapbook paper featuring... well... more cats.


And the inspiration from the black cat doodles didn't stop here, either! My talented friend Ana is both a bookbinding expert at Uituka and a wonderful artist. She took the doodle to another dimension with watercolor. Her drawing is of a Blue Russian cat - these cats are rumored to come from wild northern cats, agile swimmers who catch fish. Hence the swimming suit :)
So you see, doodles are the gateway to beautiful art work...


Thursday, December 20, 2012

Winter Creatures


Pin It

The winter creatures came from the cold forest to live on my kitchen wall. In here it is warm and cozy, they might even find food, salt and water to survive the winter. Some of these creatures might miss the winter birds from the forest, but there is a nest of pigeons right next to the kitchen window, so they are in good company. 


The brown bear has an old sweater with geometrical patterns - perfect for the cold weather. We kept expecting him to fall asleep, because the bears hibernate in winter time, don't they? Only this one is too busy, guarding the sleep of a tiny girl in its paws. I found the prints at a fair then googled them: kissing foxes - Belly Rubs & Fox Cubs by Inaluxe; Pink circles by Elisabeth Hellman; Mister Fox by Native Vermont; Alphabet E by Paul Thurlby; Mr. Bear by Christine Pym. 


A little word about that rugged wall you keep seeing in my kitchen photos: it isn't a wallpaper! Nor a backsplash! Nor tiles! It is pure archaeology, so here is the story. When I first moved into the apartment, this is where the heating system used to be. It broke at some point and I had to buy another one (and moved the new one on another wall, for a better layout of the counters). When I removed the old heating system, this is what we found behind it: the original paint job of the house from 1983. Yes, ladies, that is paint and the dotted pattern was made with a brush and white paint :))


This is the larger picture, where you can see the kitchen counter, the archaeological spot on the wall, the burner, the new heating system on the right and the spice jars above. Also my cat Anais, whom you already know a little too well, would not move from the window and I didn't have the time to take other photos (we have very little sunshine, because it's been snowing every day for the past two weeks).


Monday, December 3, 2012

Christmas Gift Wrap: Snowflakes And Pompoms


Pin It

Following my recent neon Christmas inspiration post, I took out an old neon wrapping paper and my snowflake paper punch and got to work. This is simple to do and beautiful to look at. As I was putting together the finishing touches on the first Christmas package, I felt like there was something missing. A third dimension. So I got to play with some white pompoms and the gifts were ready to present.


Friday, October 26, 2012

Autumn Gift Wrapping


Pin It

This kind of Autumn gift wrapping would be perfect for Thanksgiving presents, I guess. I actually made it for my mom, who is born in October. I spent one and a half hour shopping for her in my favorite bookstore (she is an avid reader and I wanted to surprise her) and only 10 minutes making this simple gift wrap, inspired by Fall. I chose natural items already in hand, like the gray yarn and the seabuckthorn branch. For a little extra bling, I went with a silver wrapping paper, although I don't normally use metallic decor. But I love the way the silver brings out the boosting color of the seabuckthorn :)


For those of you who never heard of seabuckthorn before, let me tell you that you can find it near the woods and it's pretty common here in Romania. Careful with those thorns, if you wanna pick it yourself! The seabuckthorn has a gigantic quantity of vitamin C (ten times more than oranges), as well as minerals and beta carotene. It is a powerful antioxidant and we use it to make a sweet-sour tea, to fight the cold.


Also, may I present my lovely assistant Anais, who is a tremendous help when it comes to wrapping gifts. She always gathers the materials needed for the job and sits on the wrapping paper, to keep it warm. Then, she makes sure that the yarn ball is properly confused, by spinning it around for a bit. Thank you, Anais, I am counting on your talents, now that we must prepare for Christmas gifts!


Click here to see more gift wrapping posts :)


YAY! The simple Fall gift wrap has been featured at Homework, Destination: Craft, Organize And Decorate Everything, The Blackberry Vine, JAQS Studio, Ginger Snap Crafts, Little Inspiration, Blueberry Craft And Hobby Time and Clean And Scentsible. Thank you so much, Carolyn, Kathryn, Jami, Ginger, Angie, Ewa and Jenn -  it means so much to me :)
homework      Organize and Decorate Everything  Tuesday To Do Party
     

LinkWithin

Related Posts Plugin for WordPress, Blogger...