Showing posts with label Halloween. Show all posts

Monday, November 11, 2013

How To Decorate With A Super Gourd


Pin It

Difficulty: easy peasy;
Time to complete: 10 minutes;
Budget: 1 euro for the gourd;
What I love the most: the contemporary look (which is exactly what I was going for).

Autumn is the perfect time to decorate with elements of nature. There are so many round pumpkins, fiery colored leaves, delicate wild berries, perfect pine cones and crazy looking gourds, that it's practically impossible to resist them. You just have to bring the nature indoors! 
Speaking of crazy shapes, I got this plus-size gourd on a September trip to the South of Romania. It looks like a cross-bread between a bowling pin and a wine decanter, don't you think? I decided to make it the living room attraction, but decorating with a huge gourd is no easy challenge. In case you need to decorate with a single gourd, follow a few design rules:


So let's see what can be done to create a vignette for this outstanding gourd:

1. LOCATION, LOCATION, LOCATION!
Find the perfect spot for your display. Choose a common room if you want more visibility. Make sure that your vignette gets plenty of light and that it's not overshadowed by other decorations in the room. 
The first question was "Where to put the gourd?". My first option would have been the home office, but there already was another gourd arrangement on my desk. So I decided to put it in the living room, where all my friends could see it from the moment they entered the room.

2. CHOOSE YOUR STYLE. 
Should you make a traditional Fall-ish shrine to nature? Should you go streamlined and minimal? The simplest way is to assess your room decor style and to create an assorted vignette.
Even if the classical approach is to make a fall arrangement with many gourds and leaves, I wanted to use the giant gourd as a stand-alone attraction. It also works best with the eclectic style of my home.


3. CHOOSE COLOR, SHAPE AND TEXTURE.
Start with the color of your gourd and work your color scheme around it. You can use a monochromatic, a contrasting or a complementary color scheme, depending whether you want your vignette to look natural & soothing, striking or interesting, respectively.

You don't need to buy new stuff! Go through your cabinets and find items to fit your color scheme.
I decided to use a complementary color scheme, with maximized contrast, for a guaranteed WOW effect. The gourd is green and green's opposite color is red. Green and red would be my color scheme. From this point on, we were down to business. Once I had the plan, I chose the DIY pink/red side table as my base. In the cupboards I found a red pitcher and a red candle holder. They were both round in shape and made of glass, similar in shape to the gourd's "belly" and contrasting with the heavy texture of the gourd.
For an eye-pleasing effect, I added a few items in neutral colors (the lamb and the baby-breath flowers) and  some cute tiny accents (the washi tape and the felt balls).


4. THE TRIANGLE LAYOUT. 
As you may already know, when in doubt use an asymmetric "A" shape layout. This way you make sure that the eyes of the beholder travel throughout the entire vignette. Layer the elements, placing the taller ones in the back row and the smaller ones in the foreground.

The gourd has been a successful conversation-starter, namely because I've made it the focal point of the room. Also, my boyfriend is amused by its shape and size and calls it "his arch-enemy", so the super-gourd is a great addition to our home :)

Thursday, October 31, 2013

Happy Halloween!


Pin It

... and remember to have fun, dear friends! Wherever you are, whatever you do; if you trick or treat; if you celebrate Halloween or not; if you party or if you stay home.... have lots and lots of fun! xoxo

Monday, October 28, 2013

Random Halloween Home


Pin It

Hello, friends, this is a special version of my traditional "Random Happy Home" series, dedicated to the upcoming event. A holiday which has no history in my country, but is currently extremely popular in our shopping malls, cinemas and supermarkets. Nevertheless, I am happy to get inspired by such a generous theme and to freshen up some details in my Romanian home. The first pic is an update on my DIY witch lamp, sitting pretty above some seriously scary books from Agatha Christie.


Next, just a little reminder that nothing goes according to plan. Specifically, I wanted to revive my favorite Halloween project from 2012: the skull miniatures. Yes, yes, my friends, forget about the witch lamp and its successful journey through blogoland. THIS is my favorite DIY and I wanted to recreate the vignette this year, in order to practice on my photo shooting technique. But as soon as I got started, the sun hid in the clouds and the cats attacked the little black bunting, so all I have is this pic.


And let's not forget about the neon pumpkin (also from last year - I can't believe that I had all this time and energy to come up with so many silly projects!). I admit that this photo is not from right now, since the gourd has started to melt on the side... but for quite a while, we've had the most unusual book stopper :)


End of story.  I must leave you now, the blues and oranges of real life are fading into the fairy tale illustrations of Romanian artist Madalina Andronic, whose book I must study now. Intensely. Good bye!

Friday, October 25, 2013

Black Cat Doodles


Pin It

Yesterday's post about a minimalist Halloween vignette - featuring just an over-sized picture of a spooky black cat - reminded me of the sinuous path from doodles to a finished item. So look what I've found, after rummaging through tons of photos taken in my first year of blogging! Doodles of a very, very surprised black cat, scribbled by yours truly in the middle of my morning "black coffee and sudoku" routine.


I liked the black cat doodles a lot, so I decided to use it as a sketch for a greater piece of art. It took me less than 20 minutes to trace the design on black color block cardboard and to carve out the big black cat, with my scissors. I also made a small version of it - a decoupage cat for which I used (oh, the irony!) a hilarious scrapbook paper featuring... well... more cats.


And the inspiration from the black cat doodles didn't stop here, either! My talented friend Ana is both a bookbinding expert at Uituka and a wonderful artist. She took the doodle to another dimension with watercolor. Her drawing is of a Blue Russian cat - these cats are rumored to come from wild northern cats, agile swimmers who catch fish. Hence the swimming suit :)
So you see, doodles are the gateway to beautiful art work...


Thursday, October 24, 2013

Almost Ready For Halloween


Pin It

If I am not mistaken, there's only one week left until the haunted night of 2013 :) My busy schedule didn't allow me to properly prepare like I did last year, but I still managed to prepare a little vignette. You know me, I don't make or buy something new unless I absolutely have to. Recycling and reusing are right up my alley, so I dug up the DIY pictures from last year's Halloween gallery wall. Of course, I chose the spooky black cat (completely understandable since I live with two crazy felines).


As always, color gives the main feeling of Halloween: the blacks, the yellows and the oranges. This is one of the rare occasions when I get to pair the camel leather Moroccan pouf with the shiny Tam Tam stool. The yellow mums were a present from my boyfriend. And if you're wondering about the rug... it's been in my family for generations. It actually belonged to my great-grandmother. I remember this beautiful rug in my grandma's kitchen, where nothing bad could have ever happened. My mom washed it for me and I'll surely post a lot more pictures of it in the months to come.

Wednesday, October 23, 2013

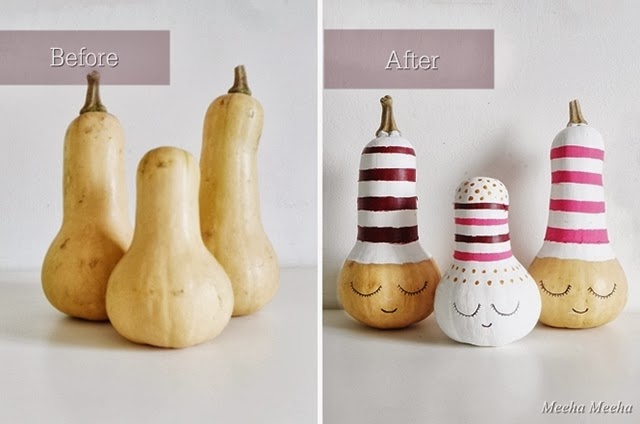
DIY Sleepy Pumpkins


Pin It

Hello, dear friends, how are you? I just had a revelation these days. I truly, utterly love Halloween. It is a time of magic, when you can be whatever you want to be - even if this is a sort of "imported holiday", since we don't have a Halloween tradition in my country, Romania. Still, the chance to walk the streets dressed up like a giant marshmallow or like a pirate deserves a celebration. So I've made these little sleepy pumpkins to mark the occasion.


Before you say anything, I know these are not exactly pumpkins, but I thought that gourds would do just as well for this DIY project. They are smaller than pumpkins, and size does matter when you live in a small home. Also, gourds have a lovely organic shape, which opens endless possibilities when I put my mind to it. Last year I've also played with gourds and made a neon pumpkin, so if you've missed it just click on the link to see it! In order to spice up my homemade Halloween, I went for the quickest and easiest way to play with the aspect of these gourds. So I painted them! 


Why did I make them sleepy, you ask me? Well, the idea came to me after staring at the pumpkins each morning, for more than a week. They were just sitting on my kitchen counter, day after day. I was too busy to sit down properly and decide what to do with them. After a while, I started to think that the poor pumpkins were getting bored, waiting to be transformed. Bored and sleepy, hence the idea to paint them into sleepy little gnomes :)


My choice of colors was not really a choice, since I didn't have the time to run to the art shop and buy new supplies. So I decided to use the colors that I already had from previous projects: white, fuchsia, gold and burgundy. I like the way they combine with the natural warm tones of the pumpkins. In making any DIY project, my advice is to use what you already have. If you make your project with love, it will look fine, no matter what colors you use.


DIY Sleepy Pumpkins Tutorial:
1. Wash the pumpkins and let them dry properly. Use elastic bands to configure your design. Elastic bands work better than masking tape when you paint on irregular shapes.
2. Paint the white base coat. I used acrylic paint. It sticks on any surface and it is water-based, so you can thin the color if you're going for a more delicate texture.
3. Let the pumpkins dry for an hour or so, then paint a second coat in order to get a nice opaque finish.
4. Continue with the top color. Make sure to respect the elastic band markers. Use 2 band for each row.
5. Finish off by painting the eyes and mouth with a thin liner. Enjoy!

Wednesday, October 31, 2012

Happy Halloween!


Pin It

Lovely ladies, I've got an old friend who wishes to send you a "BOO!" from my little enclosed balcony. Berigunda is a blue eyed witch with plenty of stories to tell. She lives in an invisible house between my pots and makes all sorts of spells to keep the home happy. I have to supply her crocodile tears, sparkling star dust, apricot jam and white lies on a regular basis. But it's all worth it :)


Thursday, October 18, 2012

Edible Place Cards For Halloween


Pin It

It seems that I will go to a little Halloween party, after all :) I thought it would be nice to bring something for the table: place cards! Easy to do and a pretty addition to any tablescape. To kill two birds with one stone, I will make these place cards edible, so that when you are finished admiring them you can also eat them (for desert, if you are well-mannered, or before the main course, if you are still a child at heart).


Sunday, October 14, 2012

Neon Pumpkin


Pin It

I know, I know, it's a gourd! But I like this shape better :) Halloween is approaching fast and there was no pumpkin in the house. The perfect time to try out my first neon project. I keep pinning wonderful neon images, my friends gave me a set of neon watermark colors and my autumn decor was in need of a funky addition. Enter the neon pumpkin, the star of the home!


This is easy and quick to do. I've snapped some pics for a little tutorial. First, mark your separation line with duct tape and paint the whole thing white (I used acrylic paint). Second, use the duct tape to set a new line and paint the neon graphic line. Add some dots for a whimsical effect. Remove the tape and you're done! Actually, when I removed the tape over the white paint there was a little accident and some of the paint got stuck to the tape and went away. Oh well, I could have repaired that but I love the perfectly imperfect neon pumpkin :)

Saturday, October 13, 2012

Halloween Gallery Wall


Pin It

Friends, this is the reason why I took all the art down this week. I was in the mood for a dramatic change: a gallery wall with a Halloween theme. Now it is finally done and I get the feeling that I live in a completely different house. Every time I walk into the living room, the bold art strikes me in the face. It's like living on a film set (and what's to complain about that?)


To tell you the truth, I just wanted to have a black pear on my wall. You know me, why pay for something when you can do it (almost) for free? So I payed a visit to my favorite supply store, where I found a sturdy black cardboard that stole my heart with its matte finish and soft texture. I came home and I traced the outline of the pear, cut it with the Exacto and framed it the next morning. So far so good, only that my beautiful pear didn't go with any of the thin-lined art from the Fall transition living room.


"Well, I'll just have to change the rest of the art" was the first thought that came to my mind. As the spooky Halloween approaches, the theme came to my mind naturally. Good thing that the pear was already black: it's quite appropriate for Halloween! I just went out and bought some more of the same textured black cardboard, just enough to replace all the other pictures in the room. This way, I only payed like 4 bucks :)


Thursday, October 4, 2012

Halloween Miniatures (From Headphones)


Pin It

Halloween isn't gonna catch me unprepared this year. I've got this vintage orange lamp shade to light my way through the haunting spirits. Yup, I just got the little lamp shade from the thrift store and my lamp collection is expanding beyond my current storage capacity. Oh, well, I don't even wanna stop. I am like the Brigitte Bardot of lamps! But let's get back to Halloween: I've got a copper bell to chase away vampires, a little black bunting and an old tobacco box filled with good spells. Oh, now I also have two skull miniatures.


It all started with my BF's brand new headphones. They came with an extra-pair of furry black covers. Of course, a guy could never stand furry stuff on his ears! I was just about to throw them away, when I noticed that their shape was like a thick, fluffy frame. And they were so black... I thought of designing miniature portraits to go with them. And since we are approaching Halloween, I drew skulls (such a no-brainer!)


Given my limited drawing skills and the smallness of the headphone frames, I kept the miniature portraits pretty simple, in black and white. Then I came up with the orange hair, because it's Halloween after all :) I love the little furry medallions, trapped in the spider web! They DO look a little Goth for my taste, but I pride myself in always trying new stuff and incorporating it into my own style.


Thursday, September 27, 2012

DIY Witch Lamp


Pin It

One month left until Halloween! I don't have a mantel to decorate for the occasion and I'm not extremely fond of pumpkins. So what to do, what to do? A little witch lamp, of course!  It's black like a real witch and it's got witch stockings, too :)) I used an old Ikea lampshade for the top and a yellow base from the gay lamp for the bottom. Oh, I also drew and decoupaged the Halloween spooked cat. 


In order to decoupage the Halloween cat, I used an ironic patterned paper covered in... other cats:)) And we ate the eggplant the next day (grilled with mushrooms and onions).


LinkWithin

Related Posts Plugin for WordPress, Blogger...