By the time I was publishing my tutorial on how to force bulbs for Christmas, new bulbs were ready to be forced in my kitchen. This time I put them in clear vases. I like to see the long thin roots, they look like a strange ocean creature from the coral barriers. And now the white hyacinths spread their smell around my home, intoxicating me with memories and spring vacation plans.
Showing posts with label yellow. Show all posts
Thursday, February 27, 2014
Wednesday, November 20, 2013
DIY Advent Calendar: Igloo Village!
This year I thought I'd kill two birds with one stone with this DIY project: a Christmas village AND an Advent calendar. My first ideas were quite traditional, like making gingerbread houses. But after giving it a little thought, I decided to make something new and exciting: the Igloo Village! It's perfect for Christmas, since the igloos are always snowed in. And the round shapes of the ice homes are simply adorable :)
The Igloo Village is always in the mood for winter fun. It is made of origami paper, so it's light, small and easy to move around the home. Also, if it survives the holidays and the curiosity of my cats, it could be stored away in a small box, until next year. In theory, igloos are white - but mine are colorful, because when the sun shines across the endless sea of ice, the snow sparkles in soft tones of yellow, blue and even pink!
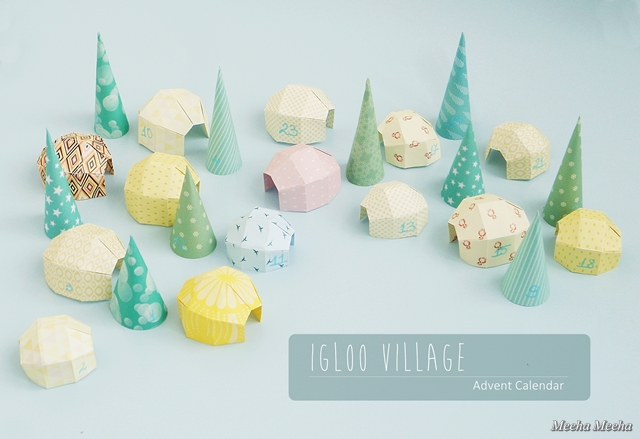
For the countdown to Christmas, I've made 24 little units: 14 origami igloos (in 2 sizes) and 10 paper trees (also in 2 sizes). Each item has its own number written on the side. The village display is random, so you need to find your next number, which adds a little to the excitement.
The Igloo village Advent calendar also doubles as a treasure hunt. Hide little treats, small messages, tree decorations or tiny toys under each house and tree. This way, the joy of Christmas gets sweeter every day! For me, it was toys all the way, as you can see in the image above. You can also use the paper igloos and trees to decorate the Christmas tree, if you hang them by a thread :)
Last but not least, I must tell you that the Igloo village looks great at night time, too! Since it is already pitch black each evening when I come back from work, it is a pleasure to take a peek at my Advent calendar, sitting quietly under the soft glow of a small lamp!
If you haven't got an Advent Calendar for this season yet, it's easy to replicate this one. I'm sharing the tutorial below, split in 2 parts: the igloos and the cone trees. It took me 3 hours to make the entire village, but prepare to spend a little more time if you're a novice in paper crafts in general and origami in particular.
Origami igloo tutorial
For this project you will need:
- origami igloo template: I used this great one from the talented Francesco Guarnieri.
- patterned square origami paper. I worked with two sizes: 8.5 x 8.5 cm square sheets and 10 x 10 cm square sheets.
- pencil and ruler for marking where you need to fold the paper.
How to make the origami igloo:
1. Lay the paper square on the blank side. Mark where you need to fold the paper in 5.
2. Start folding the paper in 5 equal strips horizontally, then in 4 equal strips vertically.
3. The folded paper should look like a grid.
4. Fold the extreme strips inside.
5. Fold again and make a little crease just like in the template.
6. Repeat another two times. The paper should look like this. Mark all the valley and mountain folds, for easy final assembling.
7. This is the tricky part: get the valley folds in one hand and flip it on the inside.
8. Carefully press the paper folds in order to make the final shape.
9. Repeat steps 7 and 8 on the other side of the igloo and you're done!
Paper trees tutorial
For this project you will need:
- cone tree template: I used these ones but in a smaller scale.
- patterned origami paper. The small trees fit into 8.5 x 8.5 cm square sheets and the tall ones fit into 10 x 10 cm square sheets.
- pencil and ruler for drawing the template outline and for marking where you need to fold the paper.
- scissors and glue stick.
How to make the paper tree:
1. Print the template on cardboard and cut it out. I didn't make the round base, just the cone. Lay the template on the blank side of the origami paper. Draw the outline. Be careful not to move the template during the process.
2. Cut out the origami paper, following the outline.
3. Fold the paper along the marked line.
4. Fold again on the other side. Apply glue on the patterned folded strip.
5. Turn the paper on the good side and put the edges together to make the cone shape. The long edge must overlap the glued strip. Gently press with your fingers until the glue sets in.
6. Enjoy the paper trees and the entire Igloo village!
Monday, November 18, 2013
The Perfect Yellow Mum
Yellow! How you're doin'? I hope you all had a great weekend :)
Today's post is nothing more than a weather-dependent blogger's attempt to fight the cold November rain and drizzle. So here are a few pics of a sunny chrysanthemum to brighten up your day. And your entire week - since it's only Monday and we've got so much to do...
The yellow mum looks like total Fall to me. In spite of Christmas coming upon us with a vengeance in the supermarkets and just about every where else in Blogoland, my mood is far from Christmas-y. So let's enjoy a perfectly spherical yellow mum on a perfectly round Tam Tam stool in orange. Oh, and the gourd which would not stand up (click here to read more about how I've finally styled it).
Thursday, October 31, 2013
Thursday, October 24, 2013
Almost Ready For Halloween
If I am not mistaken, there's only one week left until the haunted night of 2013 :) My busy schedule didn't allow me to properly prepare like I did last year, but I still managed to prepare a little vignette. You know me, I don't make or buy something new unless I absolutely have to. Recycling and reusing are right up my alley, so I dug up the DIY pictures from last year's Halloween gallery wall. Of course, I chose the spooky black cat (completely understandable since I live with two crazy felines).
As always, color gives the main feeling of Halloween: the blacks, the yellows and the oranges. This is one of the rare occasions when I get to pair the camel leather Moroccan pouf with the shiny Tam Tam stool. The yellow mums were a present from my boyfriend. And if you're wondering about the rug... it's been in my family for generations. It actually belonged to my great-grandmother. I remember this beautiful rug in my grandma's kitchen, where nothing bad could have ever happened. My mom washed it for me and I'll surely post a lot more pictures of it in the months to come.
Thursday, April 18, 2013
A Simple Gift Wrap Made With Stamps
The best things in life are free! And this is my proof - look at the beautifully gift wrapped present I got from my friend Ana, the mastermind behind Uituka handmade notebooks. She chose to wrap the present in a simple crepe paper, yellow as the hot sun. Oh how I love the wrinkled texture of crepe paper! She also hand carved a heart-shaped stamp, which she used to personalize the wrapping paper. Thank you, Ana!
Thursday, March 28, 2013
Yellow & Purple Tulips
Dear ladies, a small gift from me to all of you, because many of you will be on spring break! Please take in your hearts this bouquet: from my kitchen counter to wherever you are. Yellow and purple tulips accompanied by white freesias in a sea of fresh green - enjoy the beauty of free time and the warmth of family moments :)
Wednesday, February 20, 2013
In The Mood For... Yellow!
As I was browsing through my favorite design blogs this week, I came across some beautiful interiors which seemed to have been designed especially for springtime. They were all mainly white, with touches of sunny yellow here and there. Is it just me, or is this a trend for the Spring of 2013? The idea of yellow as an accent for my living room is more and more appealing to me... especially since I've always loved this solar color! Until I'm ready with my new decor, here is a little yellow inspiration from my previous posts. The first pic is from my yellow entryway, of course.
Yellow daffodils and white tulips on my nightstand, pop-art pillow covers, a cool tea mug and the most beautiful turquoise pitcher. Life is beautiful when you've got pretty flowers in the room!
Another thrifted lamp with off-white granny shade and yellow base from my ever growing lamp collection. Perfectly assorted to the yellow flower pot :)
Yellow tulips are hiding this vintage male Russian doll from the curious eyes. I like to think that the little man is not sad anymore.
When I made this photo session with the retro mushroom lamp (yes, yes, I know - I've got too many lamps and too little time to share them!), this was my favorite background: the hand painted faux wallpaper with a retro design from the entryway.
A little yellow stool is the perfect color accent for what used to be my beloved pink backsplash in the kitchen. It went great with the neon items on the kitchen shelf.
Even when I made this crepe paper bunting, I couldn't resist adding a hint of yellow among the other colors.
In the living room, the yellow lantern is the perfect contrast for the turquoise wall. So now, after re-viewing the endless potential of yellow stuff in corners of my home, I think I should definitely work my magic towards a spring living room with yellow accents :)
Thursday, February 14, 2013
Monday, February 4, 2013
Crepe Paper Bunting
Welcome, pretty spring colors! In honor of the first sunshine days of 2013 (I know, it's been a gloomy year so far!) let's celebrate with a happy crepe paper bunting. The event takes place at my space - in fact the party has already started in my bedroom. The painted dark purple wall (painted by yours truly!) is the perfect backdrop for all the yellows, greens, turquoise and indigo flashes of my crepe paper bunting.
Crepe paper has been my favorite DIY media ever since... oh well, kindergarten! It comes in all colors and it's affordable for anyone. Speaking of its low cost, you can use crepe paper for projects that require LOTS of material, without having to break the bank. Also, you can get creative and try lots of new stuff, because if you mess up with something, there's always plenty more crepe paper rolls and you can start all over again.
The key to display a happy bunting is to gather around some items that you love and are dear to your heart. This way, the impact on your brain doubles, triples, gets ten times bigger and you just have to smile every time you go pass the little "spring shrine". For example, my white princess lamp makes the perfect accent on the purple wall. I also love the contrast between its romantic shape and the mundane texture of the colored crepe paper triangles.
But my display doesn't feel quite right with just ONE lamp. So I also added the green apple floor lamp. An apple a day keeps the doctor away :) Also two lamps in one spot make the perfect backdrop :) And the evergreen "Two lamps are better than one" :)) Seriously now, I think this is definitely my styling signature, because in many of my home corners I've used two lamps together. And I loved it every time.
I've made the crepe paper bunting last spring, so it's not big news on my blog. Still, for those of you who need a little guidance in putting together a banner of your own, here is a small tutorial and the steps to follow:
1. Choose your colors. The variety of crepe paper colors can be overwhelming, so I suggest to play with the rolls until the color combo looks right. The safest way is to go with 3 main colors and then you can as many nuances as you want.
2. Cut the crepe paper into triangles. The triangles mustn't be even on all sides: leave one side bigger, because that's where you'll be attaching the bunting triangles to the yarn.
3. Apply glue onto the thick side of the triangles, choose a happy colored yarn and start putting everything together. Enjoy!
A big, big Thanks! to Abbie for featuring the crepe paper banner on Five Days... Five Ways, this is awesome!

Labels:
bunting,
crepe paper,
DIY,
green,
home,
lamps,
purple,
spring,
stool,
turquoise,
tutorial,
yellow
Subscribe to:
Posts (Atom)