Showing posts with label white. Show all posts

Thursday, February 27, 2014

A White Hyacinth


Pin It


By the time I was publishing my tutorial on how to force bulbs for Christmas, new bulbs were ready to be forced in my kitchen. This time I put them in clear vases. I like to see the long thin roots, they look like a strange ocean creature from the coral barriers. And now the white hyacinths spread their smell around my home, intoxicating me with memories and spring vacation plans.

Wednesday, December 18, 2013

Still In Love With The White Christmas Tree


Pin It

Wait for it...


Wait for it...


Here it is! I'm still happy to have the little white Christmas tree in the living room!


Now that the little Christmas tree is out of its box once again and the felines are busy killing it, let's go back to the Holiday preparations! My newest acquisition are the two metal Christmas stars hanging on the gallery wall. Made in Germany :) I usually stay away from brown, but I love the way these brown stars echo the trim of the granny lamp.  


There's lots of pink going on here, topped with one of the Sleepy pumpkins I've made for Halloween. Many of you suggested it would be perfect for a Christmas decor, so here it is! I've added a vintage bell - a bronze buddy for the stars on the wall. Plus, I've split the white-washed wooden bird houses on both pink coffee tables (one of which serves as a side table, actually, it's more functional this way).


My cat Junior is not impressed with the way the sun rays play with the branches of the white tree. Oh well, what does he know about the trials and tribulations of a decorating addict!


Looking at these pics, I'm so far from a Christmas-y decor, but I really like it this way. Now I need to figure out what ornaments to put in the tree, so that the cats won't eat them :))


Tuesday, December 10, 2013

Wild Herbs Christmas Wreath


Pin It

Hello, dear friends, I'm excited to announce that I've made my first DIY wreath ever! So I would like to apologize in advance, because this post is gonna have LOTS of pictures...
I've been dreaming of making a wreath since 2005, when I was just entering the fabulous world of interior design blogs. We don't have many wreaths in Romania (and there are no supplies at the craft stores) and I have always been afraid to make one. I was convinced that the leaves would fall off and that the wire base would show...

For my first wreath I wanted the real deal: real natural plants, no plastic allowed. Long story short, we went to a picnic in the middle of November, on a sunny hill at the edge of a beautiful forest. There were lots of wild herbs, which we call "immortal" because they dry out in the field and stay like this forever. I filled the trunk of my car with a bunch of herbs in awesome shades of silver, soft brown and pale lavender. Plus a few thistles. Perfect materials for a natural wreath :)


The natural herb Christmas wreath sits in the bedroom, hanging by a traditional red and white ribbon. It complements the other flowers who live by the bedroom window: a small white Saint Paulia and three orchids which are getting ready to bloom in a couple of weeks. 


Initially, I was going to make the simplest wreath design possible. At the last minute, I've decided to add a little twist to my simple wreath, so I placed the thistles in a small bouquet on one side. A little "bling" goes a long way :)


I've kept the bedding white and full of texture, combining natural white cotton sheets with linen and sheep skin pillows. It tickles the senses and lets the Christmas wreath steal the show. Each morning I smile thinking that I live in a bohemian hotel in Paris :)


How to make a Christmas wreath
If you are like me, a novice in wreath making and a little afraid to try it, I've got 3 words for you: Just do it! I'll guide you every step of the way with my DIY wreath tutorial:
1. Gather your materials: natural plants, scissors and wire. That's all you need!
2. Use a wreath base (you can find them in stores) or make one yourself, from electric cord or thick wire.
3. Make a small bouquet and tie it with floral wire. Make the front line flowers smaller than the ones in the back and spread them like a fan. Layer the colors by height: I put the short brown twigs in the front, then the longer lavender ones and kept the tall silver ones in the back.
4. Cut off the extra length of the branches. My bouquets are 10 cm (4 inches) long.
5. Make an extra bouquet from different branches for the wreath's graphic accent.
6. Repeat step no. 3 and 4 until you run out of stuff. I've made exactly 30 small bouquets.
7. Attach the first bouquet to the wreath base and secure it with wire. Make sure that the bouquet is on the outside of the base curve.
8. Continue with the rest of the bouquets, just like you did with the first one. Don't be afraid to squeeze them together - this way you make sure that the base will be fully covered.
9. This is how the wreath looks when you turn it over. Add some pretty ribbon and enjoy!


Linking up to these lovely parties.
And some of them require a backlink in the actual post, so here they are:
http://adiamondinthestuff.blogspot.ro/   http://www.myuncommonsliceofsuburbia.com/   http://www.blackberryvine.blogspot.ro/   http://www.cedarhill-ranch.com/   http://diycraftyprojects.com
http://www.sew-much-ado.com/   http://www.elizabethandco.blogspot.ro/   http://thelifeofjenniferdawn.blogspot.ro/

Thursday, March 7, 2013

White And Green Balcony


Pin It

Dear ladies, this is how my small balcony looks in the first days of March. I promised you some pics and I hope you won't be very disappointed. I know that usually my little zen spot is bursting with flowers, but this post is about a flowerless balcony. Nevertheless, I like it very much like this, all white with the green popping out of the picture. White and green, what a soothing combo!


The balcony is enclosed with glass, but the Romanian winters are very cold and there is no heater in here, so the temperature inside the balcony is very low during the cold months, somewhere around 5 to 10 degrees C (40-50 F). Not many plants are sturdy enough to endure such a cool climate, so many of my pots go inside the apartment during wintertime. The ones that make it are the evergreen house friends: ferns, sago palms, umbrella trees, spider plants and succulents. 


The lack of flowers didn't stop me from adding a little bit of color, though. There are colorful pot holders in the storage area, also the loveliest blue dotted storage box and an old friend, the shaman who acts as a cool doorstop for the balcony in the summertime. All these little spots of intense color pop out from the white background, so I keep things simple and uncluttered in here. Painting the storage area white was the best idea I had for the balcony makeover, as you can see here


Good news, my friends! My white and green balcony was featured at The Gingerbread Blog and Craftionary - thank you very, very much for sharing this simple project!
  craftionary

Tuesday, February 19, 2013

How To Introduce A New Old Lamp Into Your Decor


Pin It

There it is, my precious new old lamp! I found it in a thrift shop: wooden base, camel skin and golden tassels. It has the most beautiful curvy shape and it lights up my days (and evenings, of course). You all know that my decor style is eclectic, but my furniture is mostly contemporary. So I set for myself a design challenge - how to gracefully incorporate this granny lamp into my current home.


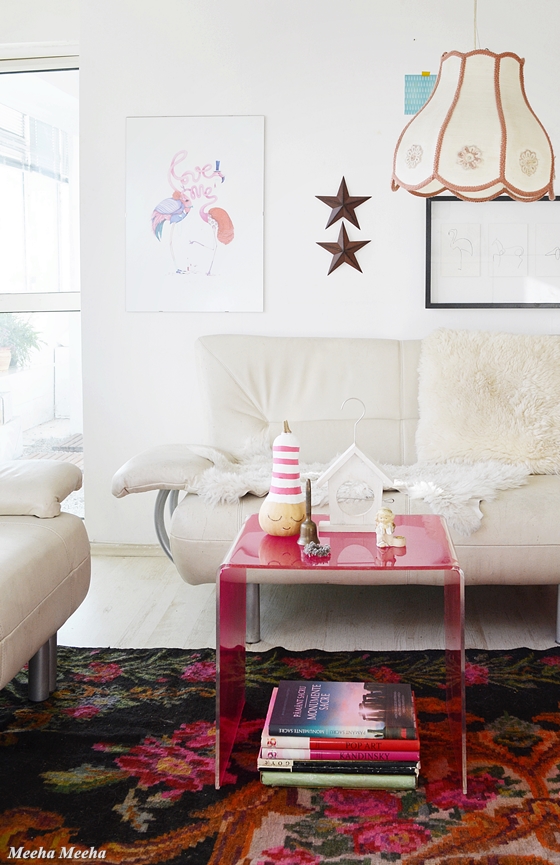
Step one: Choose your colors well. My motto is that "The best things in life are free" and my design corollary is that "Color is one of them". Color unifies objects from different eras or styles and envelops everything in an eye-pleasing cocoon. So I let the warm camel tones of my new old lamp guide me. You can see here similar shades, some lighter (honey, yellow), some darker (burnt orange), some stronger (vivid orange).Complete the rest of your decor with neutrals (white, off-white, tan, brown).


Step two: Choose a function and a space. Every object, no matter how pretty, must serve its purpose. Decide where to use your new item depending on the way you want to use it. If you get a new pillow, is it for the bedroom or for the couch? If you get a new chair, is it for the hallway, the kitchen or the dining room? My granny lamp is quite small, I wanted to put it on my desk but finally I made an impromptu reading spot in the home office, directly on the floor. Just because I feel a little boho today and this wonderful graffiti album  needs to be fully explored :)


Step three: Add lots of texture. Who said that beautiful can't be cozy? Remember that you're not updating your decor for a museum. You're doing it for YOUR home, the best place on Earth. So you've got your color scheme right and you've chosen a designated space. Now you need to add some texture, which will make it all feel great. Notice the solid wood in the herringbone floors, the crochet yarn  in the couch throw, the fluffy sheep skin pillow and the smooth leather pouf. Instant pampering for your senses :)


Step four: Add a twist to your decor. All things matchy-matchy make a boring sight. Remember to always have an element of surprise, in order to save your space from anonymity. Put a quirky picture on the wall. Display some toys in a very grown-up surrounding. Use a striking accent that you wouldn't normally expect to see. In my case, I just added this shiny fantastic plastic Tam Tam stool. It looks like it was stolen from a Karim Rashid hotel, but it completes my otherwise traditional, classical decor.


So there it is, my simple reading spot on the floor created around this new old lamp. Follow these simple rules to welcome any new item into your already existing decor. Don't be afraid to experiment - the more you try, the more you'll get the taste of it. And the results may even surprise you! 

Wednesday, February 6, 2013

Winter Valentine, Anyone?


Pin It

Hello, dear friends, my big question is how to embrace Valentine's Day AND a real wintery weather. Do you steal kisses in the snow? Do you snuggle inside a dream cabin, in front of a giant fireplace? Or do you simply ignore all that and have the best cake at the mall :)))) I'm kidding, this was just a pretext to play with my wooden hearts. Did you think I would only use them for making an Advent calendar? And did you think they came in just one size? And I also thew in a beautiful white shell, because summer is practically around the corner. Or so I keep telling myself.


Thursday, January 10, 2013

Random Happy Home


Pin It

Now that the Christmas holidays are over.... and the New Year's Eve... and the St. John extended parties everywhere.... everybody is slowly adjusting to the normal pace of life. I am crawling every day to and from work. Outside, the snow continues to bless us with a proper winter atmosphere, just like when we were little and global warming was not even a serious concept, let alone a discomforting reality. Inside, the white theme continues in each room, for a soft cotton feeling. 


In the study, a stack of over-sized pillows is ready for the usual weekend guests. I am most pleased with the way that the DIY faux wallpaper completes the winter decor, even though I made it in spring, with a very summery vibe (i.e. the park and the bicycles). 


A peek through the bedroom mirror reveals the length of my closed, dressed-up in a subdued geometrical retro pattern. A bunch of assorted pillows on the bed try to sunbathe every morning in the dim light of snowy days. Oh well, it could have been even worst and not have any light at all and no snow at all... The key to happiness is to cherish what you've got and to make the most of it :)


We interrupt this snow white program for a special bulletin. My orange cat Junior has just applied for the pattern to his new invention: how to stay warm without getting burned and without having to support your own head!


All is well on the little balcony, too. The storage unit is full of the usual boxes dressed up in vivid colors by yours truly. Many of my plants have been especially selected to survive a blasting heat in the summer months, as well as almost freezing temperatures during winter. You can spot some pink cyclamen (which are my favorite blooms for January and February) and the resilient spider plants (Chlorophytum comosum) which can't be killed by anything, in my experience.


Last but not least, a touch of green and yellow on my credenza, which used to be my improvised Christmas mantel. I put the books back in place, which makes me very happy. I think that books are a home's best friend :) You can also spot the witch lamp (hello to my special friend Ana from Carpe Diem!), the posterior of my cat and also a little glimpse of the happy entryway. And the pillows are sisters with the first ones, because I've got two of each :D

LinkWithin

Related Posts Plugin for WordPress, Blogger...