


Hello, dear friends, how are you? I just had a revelation these days. I truly, utterly love Halloween. It is a time of magic, when you can be whatever you want to be - even if this is a sort of "imported holiday", since we don't have a Halloween tradition in my country, Romania. Still, the chance to walk the streets dressed up like a giant marshmallow or like a pirate deserves a celebration. So I've made these little sleepy pumpkins to mark the occasion.
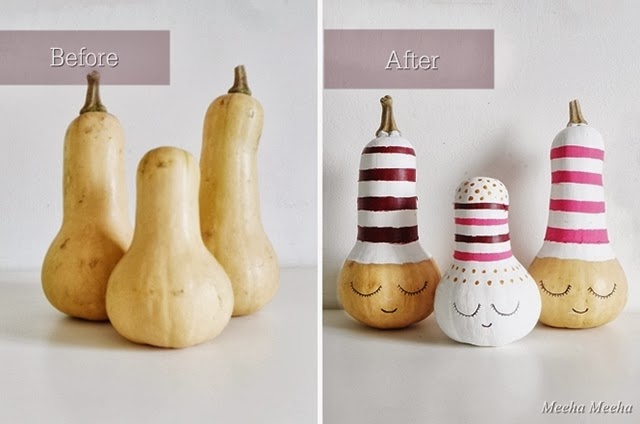
Before you say anything, I know these are not exactly pumpkins, but I thought that gourds would do just as well for this DIY project. They are smaller than pumpkins, and size does matter when you live in a small home. Also, gourds have a lovely organic shape, which opens endless possibilities when I put my mind to it. Last year I've also played with gourds and made a neon pumpkin, so if you've missed it just click on the link to see it! In order to spice up my homemade Halloween, I went for the quickest and easiest way to play with the aspect of these gourds. So I painted them!

Why did I make them sleepy, you ask me? Well, the idea came to me after staring at the pumpkins each morning, for more than a week. They were just sitting on my kitchen counter, day after day. I was too busy to sit down properly and decide what to do with them. After a while, I started to think that the poor pumpkins were getting bored, waiting to be transformed. Bored and sleepy, hence the idea to paint them into sleepy little gnomes :)

My choice of colors was not really a choice, since I didn't have the time to run to the art shop and buy new supplies. So I decided to use the colors that I already had from previous projects: white, fuchsia, gold and burgundy. I like the way they combine with the natural warm tones of the pumpkins. In making any DIY project, my advice is to use what you already have. If you make your project with love, it will look fine, no matter what colors you use.

DIY Sleepy Pumpkins Tutorial:
1. Wash the pumpkins and let them dry properly. Use elastic bands to configure your design. Elastic bands work better than masking tape when you paint on irregular shapes.
2. Paint the white base coat. I used acrylic paint. It sticks on any surface and it is water-based, so you can thin the color if you're going for a more delicate texture.
3. Let the pumpkins dry for an hour or so, then paint a second coat in order to get a nice opaque finish.
4. Continue with the top color. Make sure to respect the elastic band markers. Use 2 band for each row.
5. Finish off by painting the eyes and mouth with a thin liner. Enjoy!


