


Hello, dear friends, how are you? I just had a revelation these days. I truly, utterly love Halloween. It is a time of magic, when you can be whatever you want to be - even if this is a sort of "imported holiday", since we don't have a Halloween tradition in my country, Romania. Still, the chance to walk the streets dressed up like a giant marshmallow or like a pirate deserves a celebration. So I've made these little sleepy pumpkins to mark the occasion.
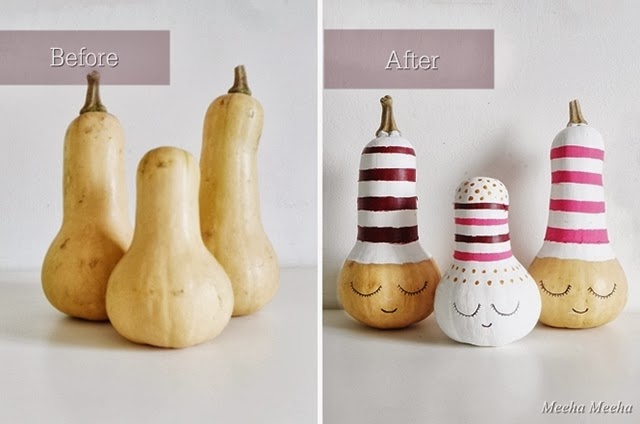
Before you say anything, I know these are not exactly pumpkins, but I thought that gourds would do just as well for this DIY project. They are smaller than pumpkins, and size does matter when you live in a small home. Also, gourds have a lovely organic shape, which opens endless possibilities when I put my mind to it. Last year I've also played with gourds and made a neon pumpkin, so if you've missed it just click on the link to see it! In order to spice up my homemade Halloween, I went for the quickest and easiest way to play with the aspect of these gourds. So I painted them!

Why did I make them sleepy, you ask me? Well, the idea came to me after staring at the pumpkins each morning, for more than a week. They were just sitting on my kitchen counter, day after day. I was too busy to sit down properly and decide what to do with them. After a while, I started to think that the poor pumpkins were getting bored, waiting to be transformed. Bored and sleepy, hence the idea to paint them into sleepy little gnomes :)

My choice of colors was not really a choice, since I didn't have the time to run to the art shop and buy new supplies. So I decided to use the colors that I already had from previous projects: white, fuchsia, gold and burgundy. I like the way they combine with the natural warm tones of the pumpkins. In making any DIY project, my advice is to use what you already have. If you make your project with love, it will look fine, no matter what colors you use.

DIY Sleepy Pumpkins Tutorial:
1. Wash the pumpkins and let them dry properly. Use elastic bands to configure your design. Elastic bands work better than masking tape when you paint on irregular shapes.
2. Paint the white base coat. I used acrylic paint. It sticks on any surface and it is water-based, so you can thin the color if you're going for a more delicate texture.
3. Let the pumpkins dry for an hour or so, then paint a second coat in order to get a nice opaque finish.
4. Continue with the top color. Make sure to respect the elastic band markers. Use 2 band for each row.
5. Finish off by painting the eyes and mouth with a thin liner. Enjoy!

Adorable!❤❤❤
ReplyDeleteThank you, Tanya, my sleepy gourds say "Good night" :)
Deletebeautiful gourds! I still remember the one you made last year, but this set is gorgeus! love them all!
ReplyDeleteThank you, Ana - each year gourds are so much easier to find than actual pumpkins - and I'm so happy that you painted some gourds, too ;)
Deletethese sleepy gourds are the most cutest things! so adorable and so content!
ReplyDeleteThank you, Yelle :)
DeleteYou have no idea how much I love these! So cute and original!
ReplyDeleteAngela @ Number Fifty-Three
Thank you for pinning the sleepy pumpkins, Angela!
DeleteThose are adorable! Leave it to you to make an awesome Halloween decoration in some lovely colors!I love Halloween too! (Maybe more than Christmas.)
ReplyDeleteSo great to hear from you again, Danni, always with the sweet words! Speaking of Christmas, we must hurry now, since we are already entering November...
DeleteSo different from scary pumkins! These are adorable and very girly.
ReplyDeleteThank you for the sweet comment, Magali! I have a weird and struggling time in my life right now so I just wasn't in the mood for scary or gloomy pumpkins...
DeleteThey are so sweet:)
ReplyDeleteThank you, the pumpkins are not exactly spooky but I like their innocent faces anyway :)
DeleteSo lovely!!!
ReplyDeleteThank you so much, Serena!
DeleteSo cute!!!
ReplyDeleteThank you, I've moved the sleepy pumpkins in the bedroom, where they can have a proper rest!
DeleteSweet as anything!! Love them. Pinning also to Fall fun. Have a great week. Linda
ReplyDeleteThank you for the lovely comment and for the pin, Linda!
Deletewhat a completely adorable idea! love love this
ReplyDeleteThank you so much for visiting, Carissa! As I said, the idea came to me because I was too lazy to make the pumpkins in the first place :))
DeleteI like your sleepy beauties the best ! Have a great Halloween.
ReplyDeleteThanks a million, I am crazy about the blown glass pumpkins but I found no way to comment on your blog.
DeleteThey are SO cute!!! Love the sleepy faces!
ReplyDeleteThank you for visiting, Annie! I fell in love with your creativity, so maybe next year you'll make some sleepy pumpkins for this year's Ariel!
DeleteOmg, I <3 these for Christmas!!! Pinned I posted DIY pumpkin pillow this week. Stop by
ReplyDeleteThank you for the pin, Michele!
DeleteWe love these! Pinning.
ReplyDeleteThanks a million for the pin!
DeleteThese are some of the cutest pumpkins I've ever seen. Love how they don't require any carving! I'd be thrilled if you'd come on over to Pink Recipe Box and link up at Creative Wednesdays: http://pinkrecipebox.com/creative-wednesdays-with-pink-recipe-box-16
ReplyDeleteNow this is such a cute and creative idea I love it. Fabulous. Thanks tons for linking to Inspire Me. Hugs, Marty
ReplyDeleteThank you so much for making time to visit, Marty, you are such a sweet and caring host!
DeleteThanks a million for the sweet comment, Steph, you can make the sleepy pumpkins, too, with the right kind of gourds!
ReplyDeleteThese are SO cute, I just had to click on them!
ReplyDeleteThese turned out super cute!! I love that you painted something other than a pumpkin. I'm hosting a giveaway for two modern printed kitchen towels that you should enter! http://homecomingmn.blogspot.com/2013/10/a-tea-towel-set-giveaway.html
ReplyDeleteOh my goodness! I'm loving all things painted pumpkin this year and these are probably the cutest version I've seen so far. Adorable.
ReplyDeleteRebekah Somewhere in the Middle
Very cute!!! :)
ReplyDeleteWhat adorable squash! I love this idea.
ReplyDeleteKC
So cute! Would love for you to share at Simple & Sweet Fridays. New Follower!
ReplyDeleteHugs,
Jody
Love this post...reminds me of the Cat in the Hat. Pinning!!
ReplyDeleteI am seriously loving these adorable Halloween gourds. I think they turned out lovely. Halloween is one our favorite times of the year. You really turned using what you have into something super cute. Pinning. Thanks for linking up with us at Inspiration in Progress. :)
ReplyDeleteNow how cute are these!!! Very Cute... Would like to invite you to come share at One More Time Events http://www.onemoretimeevents.com/2013/11/home-and-hearth-share-it-one-more-time.html
ReplyDeleteHope to see you there...Tammy
They look absolutely wonderful. Thanks for the great tutorial.
ReplyDeleteAli x
aww super sweet :)
ReplyDeleteThanks for sharing at Creative Mondays, featuring this week :)
These are so cute! I love halloween too but I can see versions of these being done for christmas and every other holiday too!
ReplyDeleteI don't celebrate Halloween, but these are adorable! I think they would work nicely in with my fall decorations!
ReplyDeleteThese are so cute and adorable.
ReplyDeleteThese are so cute! thanks for sharing :) http://www.handmadeintheheartland.com
ReplyDeleteThese are so cute! They also make decorative tape you could put around them if you didn't feel like painting stripes.
ReplyDeleteLove these! What a great idea for holiday decorations!
ReplyDeleteOver The Apple Tree
Such cute little sleepy 'pumpkins" Meeha! Great job.
ReplyDeleteThanks for linking to a Round Tuit!
Hope you have a fabulous week!
Jill @ Creating my way to Success
http://www.jembellish.blogspot.com/
These are absolutely adorable, love the sleepy look. I love gourds of any shape, color, or size! Thanks for sharing.
ReplyDeleteStopping by to Thank you for sharing at One More Time Events and let you know you have been featured http://www.onemoretimeevents.com/2013/11/dessert-display-with-flour-sack.html. Party is up hope you can stop by and share some more of your great ideas....Hugs Tammy
ReplyDelete