Monday, April 30, 2012

Before and after: Small Balcony


I love to sit on my Moroccan poufs and see nothing of the busy world outside, just the mini-garden. When I bought the apartment, my tiny balcony was already enclosed with glass and had a built-in that provides much needed storage. It was perfect for the Romanian winter blizzards, not so perfect for my intentions. I found the real-estate listing pic, it's just horrible!


Dark gloomy atmosphere and horrible clashing colors. The tiles were a dirty grayish blue and the storage was brown shelves and green cupboard doors. Also my ever growing plant collection needed a proper place to stay.

Step one: Paint every wall white. This single step made the whole difference, already. You can see that I've saved the cabinet for last. I'm sorry but these are the only pic I've got, I hope you get the idea.


Step two:  Prepare the floor. I wanted to create a zen garden, so I chose wooden slabs and marbles. The wooden slabs were raw wood, so I stained them in 3 coats of "nut tree" finish.


Step three: Make a large shelf under the windows. Making holes in the concrete walls took a whole day and was very painful, so I had no time for pics. The shelf ensures the right amount of sun for the plants and provides lots of storage space beneath it.


I ended up with a vegetation jungle, because: A. I love the look of savage English gardens. B.I can't stop trying various things. There are scented herbs (basil, savory), some flowers and some decorative green plants. C. There have to be many, many pots jammed on the shelf, so that my cats won’t be able to climb up and destroy the pots.


 Pin It

Yuuupeeee! I'm so happy to tell you that I've been featured at Polish The StarsTatertots And JelloA Diamond In The StuffBlissful and DomesticToo Much Time On My HandsDestination: CraftMe And My Boysand Addicted2decorating! All my gratitude goes to you, lovely ladies :)

      A Diamond in the Stuff   
 Too Much Time On My Hands     Photobucket  

Monday, April 23, 2012

Mini makeover: Spring bedroom


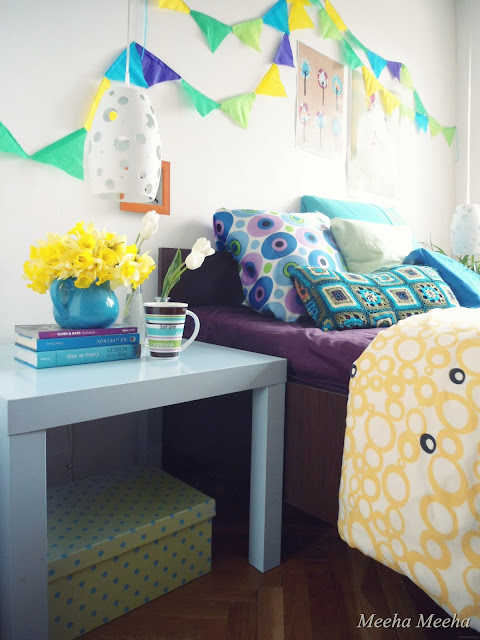
OK, I'm the first to admit that I went a little overboard this time. And my BF asked me if we were joining the Circus. But it's my bedroom and it's been raining incessantly for the last three weeks. So you can't blame me for making a little spring nest to lift up my spirits.
First of all, let's all remember the winter version of the purple bedroom (click here for more before pics):


As always, I keep the walls and furniture white, so I can use it as a blank canvas on which I "paint" with art, accessories and textiles. I didn't buy anything new. I just looked around the house and gathered everything that would fit the Spring theme.
So basically I switched:
- the pink nightstand with a light blue one;
- the purple bedding with a multi-colored one (yellow duvet cover and assorted blue and green prints for the pillow cases);
- the February orchid with the springy flowers: yellow narcissus and white tulips.
I also felt inspired to bring into the bedroom the blue jug from the blue and yellow living room


On the wall, I strategically placed the buntings made by me earlier this week in a relaxing therapy session. You may also spot the Spring Tree printable and if you want it for yourself you can download it from here.


Let's also add two more comprehensive pics, for those of you who enjoy some handsome herringbone floors. Opposite the bed, I wake up each morning seeing my gorgeous dark and mysterious purple plum wall. Please also note the beautiful vintage cabinet from my great-grandfather. The only sign of spring here is the Azalea topiary tree. Isn't she a darling?


Pin It

Good news, everyone! I've been featured at HomeworkMrs Hines ClassChristina's AdventuresRomance On A Dime and Crafty Scrappy Happy. Thank you, Carolyn, Sharon, Christina and of course Betsy and Jaime, you ladies rock!

homework chalkboard  RomanceOnADime.com Photobucket

Sunday, April 22, 2012

Crepe paper bunting

Step one: Come back late from work, tired, angry and stressed out. Look for something pretty to rest your eyes upon. Crepe paper! My favorite media since kinder-garden :)


Step two: Remember the slogan from one of your favorite blogs: "Go Do Something!" (and the blog is Dos Family). Make a bunting! Yay! Cut little triangles from assorted crepe paper.


Step threeApply glue onto the thick side of the triangles, choose a happy colored yarn and start putting everything together.


Step fourCall at wonce "Cat Services" for a feline companion, to help you make the crepe paper bunting.


Step five: I finally made two buntings, because I like overlapping stuff. A lot. Put it on the wall temporarily, to see how it looks. Go to bed happy and relaxed.


Update: Click here to see what I've really done with the bunting...

Pin It

LinkWithin

Related Posts Plugin for WordPress, Blogger...